


I'm Danidre, an author, game programmer, web developer, and software engineer!
Contents
- Introduction
- Backstory
- Contents
- Game Screen
- Loading Screen
- Mouse Inputs
- Keyboard Inputs
- Main Loop
- Audio Manager
- Texture Manager
- Scripting Flow
- Render Engine
- Data Storage with SharedObjects
- FlevaClips
- Scenes
- Virtual Camera
- Event Handling
- Root Proxy
- Performance Disclaimer
- Flevar's Future
- Conclusion
Introduction
This is a long overdue article, and its creation was encouraged by The Epic Hashnode Writeathon! It is targeted at the Web Apps category, about building browser-based games, and will be an documentation of how I —Danidre, creator of FlevaR— developed FlevaR, a declarative JavaScript game engine for creating 2D browser games and applications.
This article does not aim to be a chronological sequence of the engine's progress, nor does it aim to throw all the engine's code at you. Rather, it aims to be an overview of the current state of the game engine, highlighting the reasons behind the implementations of each component, what inspired me to make each decision, and what I would do differently in the future. I hope you enjoy!
Backstory
At the end of 2020, browsers were ending support for Flash games, meaning the plugins would no longer work. Game developers needed to find other ways to develop and distribute their games. Since its official announcement in 2017, I began learning JavaScript on SoloLearn, and had many prototypes of games and game creators. For some reason, I could only find PhaserJS and PixiJS as alternative browser engines at the time, and the idea of learning something new was daunting, so I decided to create it myself.
One random day in 2020, (and coincidentally a week before Ludum Dare 45 and Geta Game Jam 11), an idea suddenly struck me: What if someone can say "an object exists at this position, and looks this way", and the internal code would handle making it look that way, and place it in the intended destination? I got to coding right away, and a version ready in time for testing out through the game jams. Since then, I've continued to fix bugs, add features, and develop the game engine into its current state (version 2.2.0).
Right now, the engine's main features include textures, audio, collision detection, keyboard and mouse inputs, saving/loading, a virtual camera, reusable scripts, a pre-loader, and its own entity object, called a flevaclip. It was heavily influenced by state hooks inspired by ReactJS, callbacks inspired by ExpressJS and KnexJS, and APIs and abstractions inspired by Flash. Most features are created by abstracting away the complex events and functions offered by modern browsers, and providing them with simple APIs that the developer can use to create whatever game or application they wish to make.
FlevaR's Motto
FlevaR does not focus on being an engine for a specific genre of games, limiting the possibilities of developers. FlevaR simply provides the APIs as much as possible abstracted from the browser. The developer is the one that decides which ones to use for their creations, limited only by their imaginations.
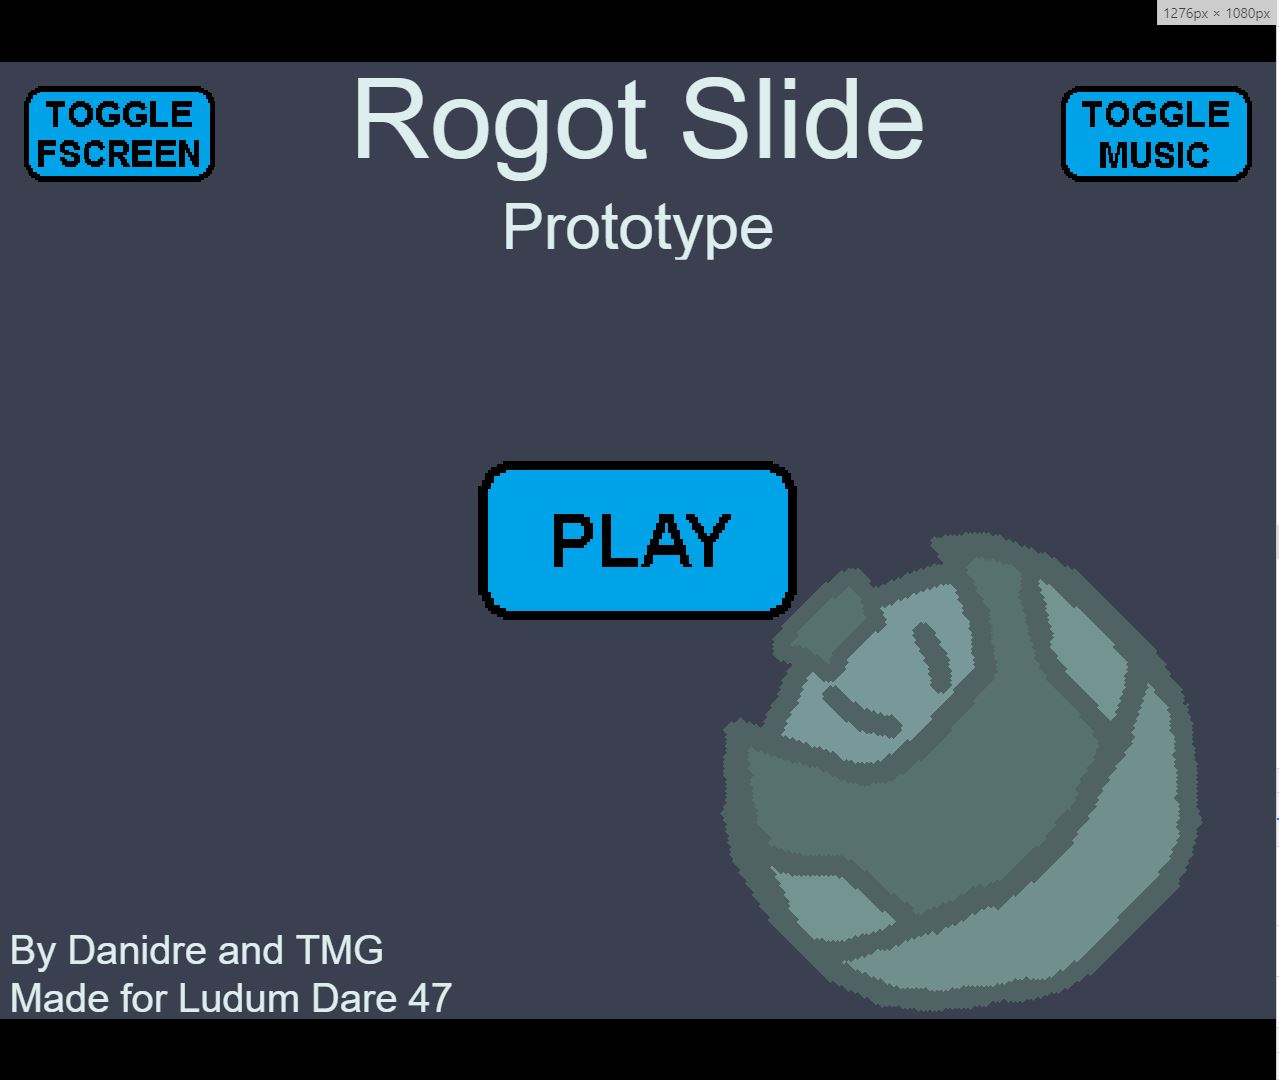
Game Screen
The first thing a player sees on the game's page, is the screen where everything is rendered.
How it works
Internally, the game screen consists of a <canvas> HTML5 element wrapped within a <div> HTML5 element (hence called container). Originally, only a <canvas> element was used. However, this proved difficult when I had to consider fullscreen or resizable applications. Wrapping the <canvas> inside a container that the engine can control would allow direct control of the position of the canvas based on absolute and relative positions in the browser:
const canvasdiv = document.createElement("div");
canvasdiv.setAttribute("style", `border-style: solid; border-width: 2px; width: ${_width}px; height: ${_height}px; position: relative;`);
canvasdiv.style.overflow = "hidden";
canvasdiv.style.outline = "none";
canvasdiv.style.border = "none";
canvasdiv.tabIndex = "0";

const canvas = helperFunction.createCanvas(_width, _height);
canvas.setAttribute("style", "position: absolute;");
const globalCtx = canvas.getContext("2d");
globalCtx.imageSmoothingEnabled = false;

canvasdiv.appendChild(canvas);
browserdiv.appendChild(canvasdiv);
It also allowed for internal calculations to handle the scaling and position of the canvas (such that it can properly be centered in screen sizes of different aspect ratios).
How to use it
When the developer initializes the engine, they must provide a default element that the engine will use, as well as options such as the dimensions of the screen, or fps of the application:
index.html
<body>
    <!-- container for our application -->
    <div id="flevaRContainer"></div>
</body>
main.js
const flevaRContainerElement = document.getElementById("flevaRContainer");
FlevaR(flevaRContainerElement, { _width: 600, _height: 500, fps: 30 });
Then, a screen of appropriate dimensions will be created and used to render all scenes and flevaclips. The resulting HTML would look something like the following:
index.html
<body>
    <!-- container for our application -->
    <div id="flevaRContainer">
        <div style="border: none; width: 600px; height: 500px; position: relative; overflow: hidden; outline: none; cursor: default;" tabindex="0">
            <canvas width="600" height="500" style="position: absolute; left: 0px; top: 0px;"></canvas>
        </div>
    </div>
</body>
The
tabindexallowed the canvas to receive focus for mouse and key inputs. Theleftandtopare adjusted internally to position the canvas in the middle of the screen.
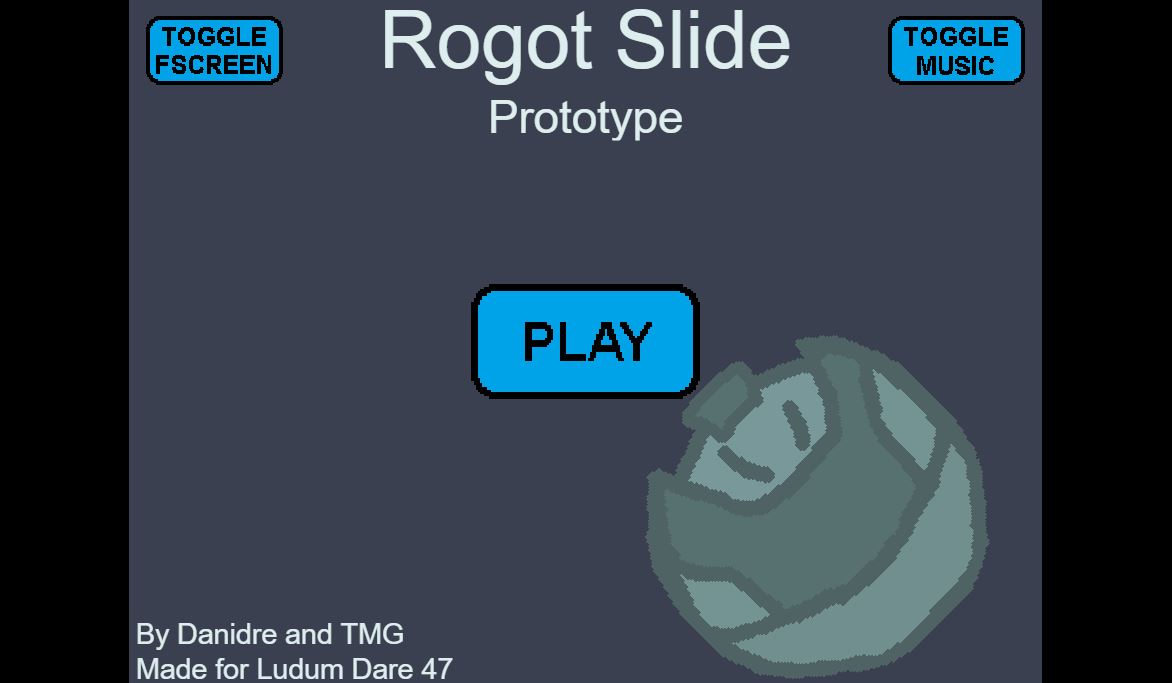
How I would improve it
Screen occupancy
Currently, the canvas only stretches to fit the provided dimensions, and multiple aspect ratios are not supported. In the future I plan on modifying the canvas (and render engine) to resize to fill the spaces shown by the black borders. This can be useful especially with mobile devices and landscape/portrait orientations.
Multiple wrapped HTML elements
Since the canvas is already wrapped in a div, if I needed to add extra elements (such as error logs when an application crashes), I could easily include it in the div without having to worry about whether the developer's website's HTML will be structured in a format to accept it.
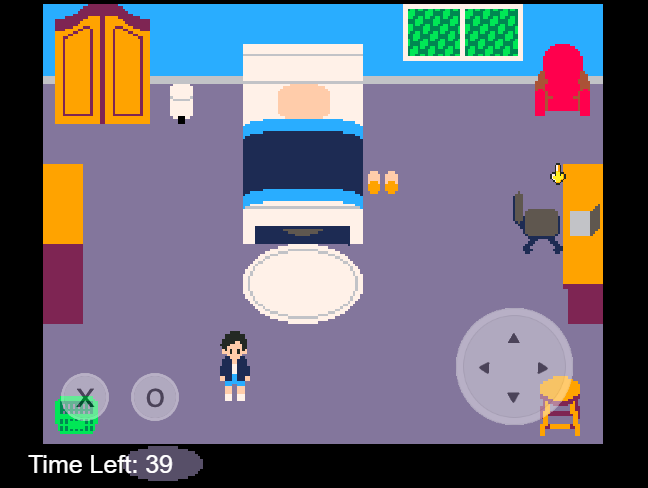
Multiple canvases
I plan on extending the engine to allow developing mobile/touchscreen games. A second canvas can be useful for displaying virtual joysticks that can be configured by the developer, and used easily by the player.
Loading Screen
Depending on the configurations of the game, the built-in loader is shown, and all the assets (textures and audio) is loaded in the browser:
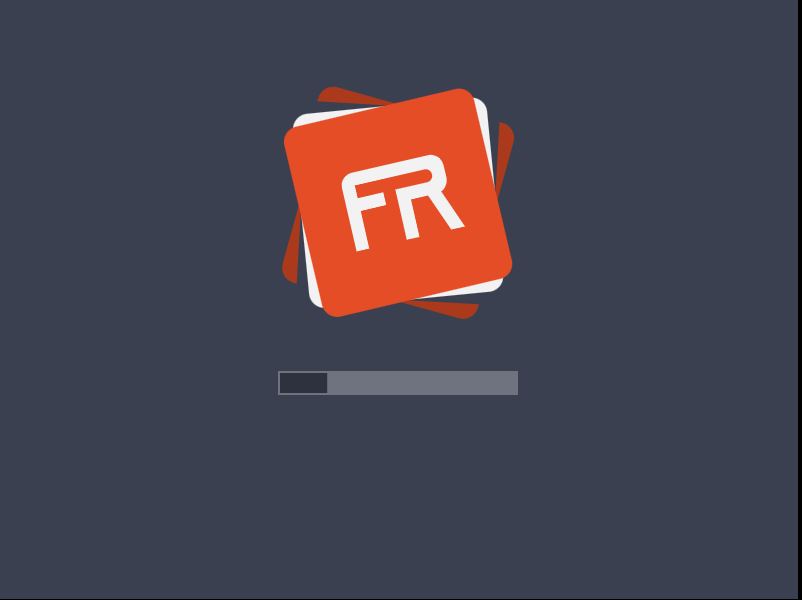
How it works
Internally, all assets passed to the engine are initially queued, and one by one loaded as JavaScript Promises, which are resolved when the onload event for the image (or onloadeddata for audio) is called. The length of the loading bar is calculated then by the current number of assets loaded divided by the initial length of the queue.
// ...other loading code
for (const asset of queueList) {
    const source = asset.source;
    try {
        await source.loadSource();
    } catch (e) {
        console.error("Error while loading assets: " + e);
    }
    loadCounter++;
    renderLoadScreen(); // updates load bar
}
When each asset is loaded, the current number increases and the loading bar lengthens. When all assets have been loaded, an option opens to allow the player to click anywhere or press a button to start the game.
Internally, I add temporary mousedown and keydown event listeners that start the main loop of the engine and immediately remove the temporary event listeners:
// ...other loading code
const finishLoad = () => {
    queueList.length = 0;
    window.removeEventListener("resize", renderLoadScreen, false);
    _screen.div.removeEventListener("mousedown", finishLoad, true);
    _screen.div.removeEventListener("keydown", finishLoad, true);
}
_screen.div.addEventListener("mousedown", finishLoad, true);
_screen.div.addEventListener("keydown", finishLoad, true);
How to use it
Within the main load function of the FlevaR application, part of the API provided allows for developers to load their textures and sounds, using relative paths of the assets:
sample directory
-- assets (folder)
   -- nice-image.png
   -- cool-sound.mp3
-- index.html
-- flevar.js
-- main.js
main.js
// ...other code
FlevaR(flevaRContainerElement, { _width: 600, _height: 500, fps: 30 }, function onload(core) {
    /* Within engine's onload */
    const { createSound, createGraphic } = core;
    createSound("mySound", { _name: "cool-sound", _type: "mp3", _path: "assets" });
    createGraphic("myGraphic", { _name: "nice-image", _type: "png", _path: "assets" });
});
These calls send the assets to the queue which is handled internally as described above.
If the engine had already been loaded by the time the APIs were called, the assets are loaded in the background. Resources that depend on the assets would default to their placeholder assets until they are loaded.
How I would improve it
Parallel Loading
Currently, assets are loaded sequentially, and each asset waits until the other is complete first before loading the next:
const queueList = [asset1, asset2, asset3];
for(const asset of queueList) {
    // await waits for each promise to be resolved, which occurs when each asset is loaded
    await asset.source.loadSource();
}
/*
Sample estimated duration:
========O                   asset1
===========O                asset2
=====O                      asset3
========================O   total
*/
I recently learnt more capabilities of Promises; you can fire multiple promises and await them all. Rather than one after the other, all assets would begin to load and resolve at shorter times depending on size:
// ...pseudocode
const queueList = [asset1, asset2, asset3];
const promiseList = [];
for(const asset of queueList) {
    promiseList.push(asset.source.loadSource());
}
// wait for the Promise.all to be resolved
await Promise.all(promiseList);
/*
Sample estimated duration:
========O      asset1
===========O   asset2
=====O         asset3
===========O   total
*/
Priority (Smart) Loading
Right now, all assets are tried and loaded. However, not all assets are needed right away (for example, boss music would not need to be loaded as the game loads). A hope is for the engine to determine which assets need immediate loading and which assets can load in the background in whatever free time is available. This can lower the amount of assets loading at engine startup, and reduce loading duration.
I have no knowledge on any methods possible to implement this just yet.
Mouse Inputs
Right after the engine loads, temporary event listeners allow the player to play the game (start the engine). Similar to Keyboard Inputs, a Mouse module is provided by the core of the engine with APIs for developers to handle mouse movement and clicks from the player.
Some Supported APIs
- Mouse.LEFT
- Mouse.MIDDLE
- Mouse.RIGHT
- Mouse.isDown()
- Mouse.isUp()
- Mouse.isPressed()
- Mouse.isReleased()
The x and y coordinates of the mouse pointer is also provided by the engine, although through a different object: _root. The x position is obtained from _root._xmouse, and the y position is obtained from _root._ymouse.
What influenced it
The mouse APIs were heavily influenced by the ActionScript 2.0 APIs provided by Adobe Flash, although due to the architecture of the main loop, I added additional functions such as isPressed and isReleased.
How it works
Conveniently, all major browsers provide mouse event listeners that can be used to get the position of the mouse relative to an HTML5 element, as well as determine when mouse actions —such as clicks and scrolls— are fired.
Mouse Positions
The convention for many games have coordinates relative to the screen with the top left of the canvas being position [0, 0], and the bottom right of the canvas being positions equal to the width and height of the canvas. Rather than leave the developer to figure out the mouse positions each frame, FlevaR abstracts this layer away and provides a simpler API for the developer to use. This helps keep the mouse coordinates consistent regardless of how small or large the screen is after initialization.
The engine adds a "mousemove" event listener to the container on engine load, and from there handles the event, computes the cursor positions based on the location of the cursor in the browser, relative to the top left corner of the container. That value is then offset by the relative position of the canvas wrapped inside the container, and scaled depending on the aspect ratio of the screen, and stored as x and y positions.
_screen.div.addEventListener("mousemove", setMousePosition, false);
// ...other code
function setMousePosition(_event) {
    const canvas = _screen.canvas;
    const rect = canvas.getBoundingClientRect(),
        scaleX = canvas.width / rect.width,
        scaleY = canvas.height / rect.height;

    const mouseX = Math.ceil((_event.clientX - rect.left) * scaleX / _screen.xScale);
    const mouseY = Math.ceil((_event.clientY - rect.top) * scaleY / _screen.yScale);

    Mouse._xmouse = numberUtils.clamp(mouseX, 0, stage._width);
    Mouse._ymouse = numberUtils.clamp(mouseY, 0, stage._height);
}
Other indirect events such as
"mousedown"(when the mouse pointer is pressed) or"fullscreenchange"(when the application enters or exits fullscreen) also call thesetMousePositionfunction to keep the internal stored mouse positions up-to-date with changes in the application.
The Mouse._xmouse and Mouse._ymouse properties are later exposed from the internals of the engine to the developer through the root proxy.
Mouse Functions
The engine also adds "mousedown", "mouseup", and "mouseleave" events to capture those actions and abstract it into easy APIs the developer can use.
_screen.div.addEventListener("mousedown", setMouseDown, false);
_screen.div.addEventListener("mouseup", setMouseUp, false);
_screen.div.addEventListener("mouseleave", setMouseLeave, false);
Providing isDown and isUp functions was easy: simply store the mouse button being held down, and the function will return a boolean if that button was stored for isDown, and the opposite for isUp.
However, it is not so simple for the isPressed and isReleased functions. Rather than try to explain in theory, here is a simplified process of how each action is handled:
// only checking left mouse button for simplicity
function setMouseDown(_event) {
    setMousePosition(_event);
    // left mouse button is code 0
    if (_event.button === 0) {
        // if the key in the list does not exist,
        // set it to true (helpful for isDown)
        if (Mouse._mouseList._left === undefined)
            Mouse._mouseList._left = true;

        // if the key in the pressed list does not exist,
        // trigger the mouse pressed function (helpful for isPressed)
        if (Mouse._mousePressed._left === undefined)
            this.setMousePressed(_event);
    }
}

function setMousePressed(_event) {
    if (_event.button === 0) {
        // set pressed to true
        Mouse._mousePressed._left = true;
        // ...other code
    }
}

function setMouseUp(_event) {
    if (_event.button === 0) {
        // if the key is in the list, remove it from the list (helpful for isUp)
        if (Mouse._left) delete Mouse._left;

        // if the key is in the pressed list
        if (Mouse._mousePressed._left !== undefined) {
            // is key in released list does not exist,
            // trigger the mouse released function (helpful for isReleased)
            if (Mouse._mouseReleased._left === undefined)
                this.setMouseReleased(_event);

            // remove key from pressed list
            delete Mouse._mousePressed._left;
        }
    }
}

function setMouseReleased(_event) {
    if (_event.button === 0) {
        // set released to true
        Mouse._mouseReleased._left = true;
        // ...other code
    }
}
Internally, three states are used: mouseList, mousePressed, and mouseReleased, and rather than just checking whether the specific button in each state is true or false, three states are used: true, false, undefined. The mouseList is used to add or remove the button from the list, to easily check whether the isDown function works. The engine will simply check whether that button exists in the state (isDown returns true) or not (isDown returns false). Inversely, isUp will check whether the button exists in the state (isUp is false) or not (isUp is true).
isUpactually callsisDowninternally and returns the opposite of that result.
const isUp = function (_key) {
    return !isDown(_key);
}
For isPressed to work, it is not enough to check whether the button exists in the mousePressed list. That is because if you hold down the button, you want the isPressed to be true only once until the key is first released, then true only once again the second time it is pressed.
On every loop*, the engine first captures all mousepresses from the event listeners and abstracts them into their appropriate states, runs the tick methods for all scenes and objects which executes the scripts that check for isPressed, and then "clears" the states accordingly. Internally, this simply changes all buttons in the pressed state to false, rather than delete them.
*This is a simplified section of what the loop does.
Therefore, if a button is pressed, it is added to the mousePressed state as true on the first state, and then false on every subsequent tick that the key is being held down, until it is removed from the state when the button is released.
for (const _key of Object.keys(_mousePressed)) {
    if (_mousePressed[_key] === true) _mousePressed[_key] = false;
}
The isPressed function only checks if the button is true in the mousePressed state, and as such is only true the first time, each time the button is pressed.
Similarly, isReleased checks if the button exists in the mouseReleased state, which is added once when the button is released, stored in the state, handled once in the tick, and subsequently removed from the list right after when the list is cleared.
for (const _key of Object.keys(_mouseReleased)) {
    delete _mouseReleased[_key];
}
Mouse Codes
The Mouse Module provides pre-computed codes for the "left" (Mouse.LEFT, which is code 0), "middle" (Mouse.MIDDLE, which is 1), and "right" (Mouse.RIGHT, which is 2) mouse buttons.
How to use it
Within any script, the developer can call the APIs in their scripts to detect when mouse activity occurs, as well as which mouse button triggered the activity:
const x = _root._xmouse;
const y = _root._ymouse;

if(Mouse.isDown(Mouse.RIGHT)) {
    this._text = "Right button is down";
} else {
    this._text = "Right button is not down";
}
if(Mouse.isPressed("left")) {
    if(this._fontColor === "black")
        this._fontColor = "white";
    else
        this._fontColor = "black";
}
How I would improve it
Cleaner Mouse API
Right now, mouse positions are obtained using the root proxy, and mouse functions are called using the Mouse module. This was done mainly to copy AS2 APIs provided by Adobe Flash. In hindsight, I see no need for separate objects having mouse-related values. Having the mouse positions simply be provided to the developer as Mouse._x and Mouse._y would be better both for simplicity, as well as speed.
The root proxy is slow. Check that section to find out why.
Touch Support
Inspired by Adobe Flash's AS2 API, I modelled as much as possible behind it; there was no native touchscreen support, so I had not even considered that in the engine. However, many game engines have support for it, and many people play mobile browser games. In the future, along with virtual joysticks, I want to add a Touch module with similar APIs to the Mouse and Key modules (with obvious differences to support all 10 touch points). To achieve this, I plan to use touch events provided by modern browsers, and abstract accordingly.
General Pointer Support
Recent browsers have general support for Pointer Events, which include mouse, pen/stylus or touch. Abstracting and providing this API as a Pointer module can continue to help developers use it for anything, such as a drawing application created in FlevaR that uses a stylus. FlevaR provides; Developer decides.
Keyboard Inputs
Right after the engine loads, temporary event listeners allow the player to play the game (start the engine). Similar to Mouse Inputs, a Key module is provided by the core of the engine with APIs for developers to handle keyboard actions from the player.
Some Supported APIs
- Key.UP
- Key.A
- Key.ENTER
- Key.isDown()
- Key.isUp()
- Key.isPressed()
- Key.isReleased()
What influenced it
The keyboard APIs were heavily influenced by the ActionScript 2.0 APIs provided by Adobe Flash; although due to the architecture of the main loop, I added additional functions such as isPressed and isReleased.
How it works
Conveniently, all major browsers provide keyboard event listeners that can be used to determine when keyboard actions are fired. The engine uses "keydown" and "keyup" events to capture these actions and abstract it into easy APIs the developer can use.
_screen.div.addEventListener("keydown", setKeyDown, true);
_screen.div.addEventListener("keyup", setKeyUp, false);
There are many ways to determine the specific key fired in the browser event listeners. For example, if the "A" key is pressed, that key can be obtained with one of the following:
// assuming the "A" key is pressed
document.addEventListener("keydown", function(event) {
    let {which, keyCode, code, key} = event;
    console.log([which, keyCode, code, key]);
    // outputs [65, 65, "KeyA", "a"]
In keeping with Flash's AS2 API, I wanted to allow developers to input keyCode numbers (65) or pre-computed properties (Key.LEFT, which is also keyCode 35); but I also wanted more flexibility, such as key strings ("a", or "enter") and more pre-computed properties not included in Flash AS2 (Key.A, or Key.ONE). To achieve this, both the key codes and key names are stored internally:
function setKeyDown(event) {
    const keyCode = "code_" + event.keyCode;
    const keyName = "name_" + event.key.toLowerCase();
    if (Key._keysList[keyCode] === undefined) Key._keysList[keyCode] = true;
    if (Key._keysList[keyName] === undefined) Key._keysList[keyName] = true;
    // ...other code
The values prepended by "code_" and "name_" help distinguish between the types. If the "A" key was pressed, it will be stored both as "code_65" and "name_a". Thus, when checking for an existing key (comparing in the isDown for example), the appropriate state will be checked:
Key.isDown = function (_key) {
    if (typeof _key === "string") {
        _key = _key.toLowerCase();
        if (KeyMap[_key]) _key = KeyMap[_key];
    }

    const keyDown = Key._keysList["code_" + _key] ||
        Key._keysList["name_" + _key] || false;
    return keyDown === true;
}
Internally, the
KeyMapstores all irregular key names and their corresponding key codes ("alt"->18;"zero"->48).
The function accepts the value passed and:
If it is a string, use the lowercase of that string and map it to the corresponding key code.
Example: CallingKey.isDown("FIVE")will internally look for the key code 53, etc.Compare whether that
_keyvalue —prepended with"code_"or"name_"— is in the keylist state.
Example: CallingKey.isDown(65)will compare with both"code_65"and"name_65", which will match with the first option if that key is in the list.
CallingKey.isDown("B")will compare with both"code_b"and"name_b", which will match with the second option if that key is in the list.Return the result.
Evidently, options such as "name_65" and "code_b" will never exist, but the double setting allows for the most flexibility.
In modern browsers, both
keyCodeandwhichproperties are considered deprecated. However, they were still implemented in keeping with Flash's AS2 API —as well as to, once again, provide key flexibility— with an encouragement to use the modern suggestedkeyproperty.
Keyboard Functions
Similar to the Mouse Module, FlevaR's Key isDown, isUp, isPressed and isReleased functions are implemented with the three states and managed with the loop system.
How to use it
Within any script, the developer can call the APIs in their scripts to detect when keyboard activity occurs, as well as which key triggered the activity:
/* Within flevaclip's onload */
const speed = 5;
if(Key.isDown(Key.A)) {
    this._x -= speed;
} else if(Key.isDown("d")) {
    this._x += speed;
}
if(Key.isDown(87)) { // w
    this._y -= speed;
} else if(Key.isDown("S")) {
    this._y += speed;
}
if(Key.isDown(Key.Q)) {
    this._rotation -= speed;
} else if(Key.isDown(69)) { // e
    this._rotation += speed;
}

How I would improve it
Gamepad Support
Inspired by Adobe Flash's AS2 API, I modelled as much as possible behind it; I was not aware of any native gamepad support, so I had not even considered that in the engine. However, many game engines have support for it on browsers, and it is also something I personally want to provide in the engine. To achieve this, I plan to use gamepad APIs provided by modern browsers, and abstract accordingly.
Main Loop
After the engine has been loaded the main loop begins. For FlevaR, this loop is basically a function that is called repeatedly for the duration of the game, which gives the player the illusion of an animation and game. In this loop, all scripts are executed and objects are rendered. However, many more operations occur within each loop, and with the help of events captured by the browser, the general internal execution system of the engine is as follows:
The Execution System
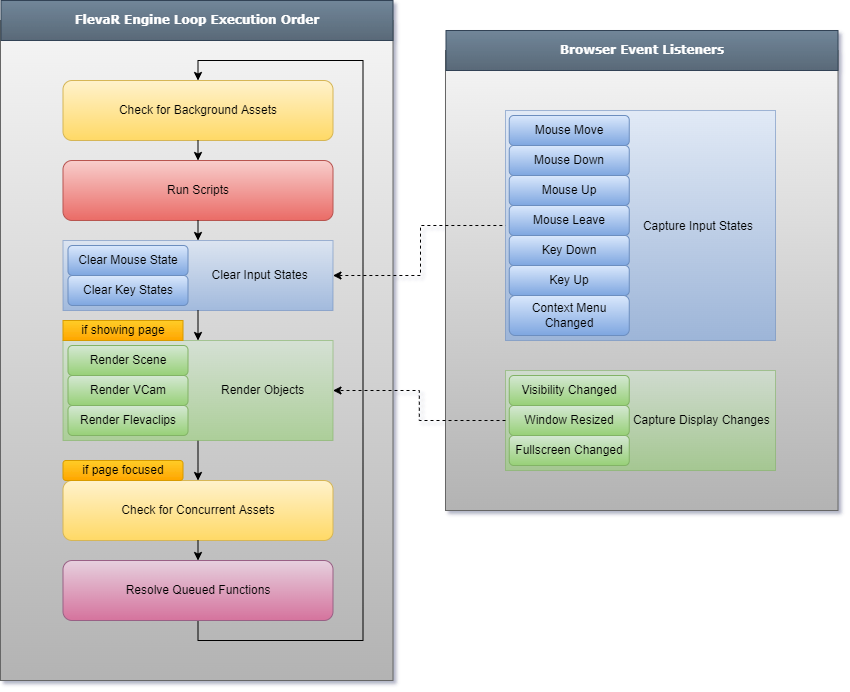
Check for Background Assets
The main assets loaded before the game begins are created within the engine's initialization script. Therefore, it is possible that the developer would have code stored elsewhere to load assets at other points in the running of the game (after it has loaded). The engine simply checks the queue for assets and sends them to be loaded in the background (if they aren't already in the process of being loaded)
Run Scripts (Tick Method)
Scripts are created and attached to objects as callbacks. The tick method crawls through the engine core, current scene, and active flevaclips and executes the scripts the developer would have written. The order of script execution depends on the order the object was added to the screen.
Clear Input States
After the scripts are executed, the input states would be refreshed to be recaptured by Browser Event Listeners and abstracted again. This helps methods such as isPressed and isReleased on the Mouse and Key modules work.
Render Objects (Render Method)
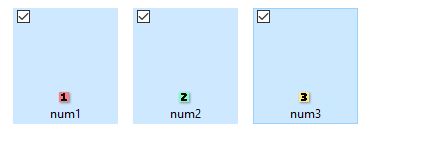
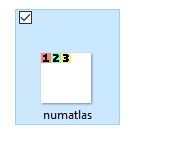
Although each object has its own tick and render methods, they are called separately. Unlike the tick method, the order of rendering is not only dependent on the order the object was added to the screen. Flevaclips can have varying depths, and are added to a list based on their depth value. It is very possible that the first flevaclip has a higher depth than the last flevaclip, and the 3rd flevaclip has a lower depth than the 8th flevaclip, for example. When rendering, the list is traversed in ascending order and flevaclip rendered; thus, flevaclips with a higher depth would be rendered after a flevaclip with a lower depth, and as such would be seen on top.
The depth sequence of the above flevaclips, from lowest to highest, would be: 1, 2, 3 (left); and 1, 3, 2 (right).
Check for Concurrent Assets
Rather than waiting for extra assets to be loaded in the background, some developers may want to pause the game until they are loaded. At this stage, any assets added with the concurrent option would then be loaded.
Some browsers never load assets if the page is not currently selected. Thus, this function is only called if the page is focused.
Resolve Queued Functions
Some engine functions must be executed asychronously, even if the developer does not explicitly do so. Additionally, other functions must be queued until the player interacts with the application (such as playing audio). Depending on the state of the engine at that point of method call, the functions may be executed right away or queued and executed at a later time.
That "later time" is at the end of the loop cycle, after scripts are ran, assets and states are managed, and objects are rendered.
How it works
For FlevaR, I wanted a reliable and consistent loop.
setTimeout and setInterval
I first considered using setTimeout and setInterval, since they can call functions repeatedly with a consistent time delay.
setTimeout and setInterval Limitation
However, I noticed that the time delay was only consistent while the page was focused; anytime you left the page, each interval would take longer to be called instead of the set time.
With an intended fps value of 30, the expected average frame delay is
33ms(1000 / 30); however, it jumps closer1 secondwhen the game tab loses focus. Check here for an interactive test.
This reduced the reliability of setInterval's consistency, since I wanted it to execute at the desired frame rate whether the tab was focused or not.
requestAnimationFrame
The second thing I learned was the browser's requestAnimationFrame. It was created for browser animations and thus was better suited for animation loops in games.
requestAnimationFrame Limitation
Unfortunately, this method was also unreliable in moments where the tab was hidden.
Custom Function
After more research, I briefly learnt about Web Workers, which run scripts in the background and sends responses to the foreground. Fortunately, setTimeouts work consistently in web workers, even when the tab isn't focused. Thus, FlevaR creates a background timer (web worker) that sends a message to the foreground in consistent reliable intervals (calculated based on the fps) that calls the main loop's function. When the loop function is complete, a message is sent to the background timer which will calculate the time passed and determine how long it should take before sending another message to the foreground.
Assuming an fps of 25, frames should be called every 40ms from the time the loop starts: 40, 80, 120, etc
If the first frame called at 40ms takes 7ms, the next time out will be called to accommodate for the time difference, keeping the delay between each call as consistent as possible.
0ms:
    Loop begins
    Background sets timeout for 40ms
40ms:
    Timer sends message to foreground to run loop
    Loop function takes 7ms to complete
47ms:
    Loop sends message to background that loop completed
    Background sets timeout for 33ms (80ms - 47ms)
80ms:
    Timer sends message to foreground to run loop
    ...
Due to how browsers work, the delay is never 100% accurate, but with this method it was always close and accurate enough.
How to use it
The developer does not actually worry about the main loop. It is handled internally from the moment the game loads. However, considering that developers may also want custom timeouts that are reliable even when other tabs are focused, FlevaR provided createTimeout, removeTimeout, createLoop, and deleteLoop functions with similar APIs to the browser equivalents (setTimeout, clearTimeout, setInterval, clearInterval). The benefit to using the FlevaR provided functions was that they were called with consistent intervals, regardless of whether the browser was focused or not.
// create plain "Hello world!" function
const myFunction = function() {
  trace("Hello world!");
}

// call function every 3 seconds
createLoop(myFunction, 3000);

/* Output expected */
// > "Hello world!"
// > "Hello world!"
// > "Hello world!"
// > "Hello world!"
// ...
How I would improve it
Fixed Timestep
Although reliable, the loop struggled to keep an FPS of 120 when that value was set. I'm uncertain whether it is due to the high delay of a web worker communicating with the foreground, but that could be a bottleneck when you want each frame to be called every 8.33ms (for 120 fps). The best option to take would be to use requestAnimationFrame, since it was created for such consistent animations. However, in cases where I want a game to be up to date (with all scripts running consistently), this option fails when another tab is focused.
Gradually, through- many- gameloop- articles, I believe the best thing to do would be to call the loop as much as possible. In it, the tick methods and scripts will be called zero, one, or multiple times, depending on how long ago the last frame was called, compared to how often each frame should be called.
const fps = 30;
const step = 1/fps;

let now;
let dt   = 0;
let last = timestamp();

function frame() {
  now = timestamp();
  dt = dt + Math.min(1, (now - last) / 1000);
  while(dt > step) {
    dt = dt - step;
    tick(step);
  }
  render(dt);
  last = now;
  requestAnimationFrame(frame);
}

requestAnimationFrame(frame);
Code used from this article.
That way, even if the tab loses focus, if the last frame was called 1000ms ago when 30 frames were supposed to be called during that second, the tick method would be called 30 times within the while loop, and then the render method would be called only once after that, to reflect the latest change. It will make up for the lack of interval consistency by simulating the frames as much as possible to get back on track.
Fixed Timestep Advantage
With the fixed timestep, a delta can be provided from the engine to the developer that would be used to develop deterministic games. The delta would basically be the same each frame; the engine will make the necessary steps to keep everything else consistent even when delays occur.
Fixed Timestep Disadvantage
The only possible downside I can see with this option is the delay in an online multiplayer game. It is important to get updates from the server multiple times every frame and process them accordingly; even a drop in frame can have visible effects on the player when they leave and return to the game tab. They may have to queue updates from the server and lerp differences to maintain visual consistency when the player leaves and returns to the game tab. However, I leave that up to the developer to implement.
I still have more to consider before I determine a better loop to use that is both fast and reliable, so more research is necessary here.
Audio Manager
Depending on how the developer created the game, music is played at the menu screen, or sound effects are triggered when buttons are hovered or pressed. FlevaR's audio manager abstracts the way browsers load audio, and provides a simple API the developer can use for their games.
What influenced it
The audio APIs were created and modified from previous versions of games I worked on before the FlevaR game engine.
How it works
When the developer calls the functions to create sounds in the game, Audio objects are created internally. By default, the engine assumes the audio files are stored in an asset folder in the working directory of the application. However, developers can also provide parameters to change the path, name, and extension of the audio file.
When the create sound functions are called, the sources of the audio files are queued and loaded sequentially (while the game is loaded) or in the background (when the game is being played). Internally, FlevaR uses the Audio object's onloadeddata event to determine when enough of the file has been loaded and can be played.
Some browsers do not fire the
onloadeddataevent in time for the asset, which caused errors of applications freezing on load because the event was never fired. As a result, FlevaR checksonloadeddata,onloadedmetadata,oncanplay, andoncanplaythroughevents; The asset will be considered loaded based on whichever event is fired first.
When the asset is loaded, APIs are made available to interact with the sound file (play, clone, stop, and more). Properties are also provided for the developer's convenience (volume, loop, and more).
How to use it
The default syntax to create a sound is createSound(name, config). The developer first creates a sound clip, providing a name, and if necessary, the sound's path in the working directory of the application:
Example
Create a sound clip, using an mp3 audio clip called mySound from an assets folder in the same directory as the html file:
/* Within engine's onload */

createSound("mySound", { _name: "mySound", _type: "mp3", _path: "assets" }); // <- either

createSound("mySound"); // <- or
Note: In this scenario, the
configobject can be omitted, because if none are provided, by default,type = "mp3",path="assets", and thenamewould be what was provided by the developer.
Create a sound clip, using a wav audio clip called meow_sfx from an audios folder in the same directory as the html file:
/* Within engine's onload */

createSound("mySound", { _name: "meow_sfx", _type: "wav", _path: "audios" });
Create a sound clip, using a free audio file from another website/url:
/* Within engine's onload */

createSound("mySound", { _src: "https://a.fakeaudiourl.com/rQIk1oe.mp3" });
To use the sound clip, the developer can use the APIs provided by the Sound Module:
/* Within scene's async onload */

const mySound = Sound("mySound");

await mySound.play(); // <- either

await Sound("mySound").play(); // <- or
Check FlevaR's docs for more uses of the
Sound Module
How I would improve it
Deferred Playback
When the developer calls mySound.play(), the engine tries to play the audio right away. Some browsers prevent this from happening if the tab has not been interacted with by the user, which causes the engine to return an error and crash in these instances. An internal check can be created to determine whether the player interacts with the application or not. If they have not; the audio methods can be queued, so that only when the player clicks into the screen, the queues will be resolved, the audio methods will be executed, and the browsers will not complain or crash the engine.
Spacial Audio
Rather than an improvement, a feature I considered adding was audio with a position in the application. The volume would increase or decrease based on the distance the audioclip was from a flevaclip or other object in game.
However, I realized that this functionality can be easily implemented in a flevaclip instead. Due to the nature of flevaclips being reusable components, I scrapped the implementation to allow the developer that option, as well as keep the engine as minimal as possible.
I know I say minimal, but the engine has about 8000 single lines of code.
Texture Manager
Similar to the Audio Manager, images are handled by FlevaR rather than the developer worrying about loading and managing them. In FlevaR, they are referred to as Graphic types, and all APIs used to interact with them follow a similar name.
What influenced it
The texture APIs were created and modified from previous versions of games I worked on before the FlevaR game engine.
How it works
When the developer calls the functions to create graphics in the game, Image objects are created internally. By default, the engine assumes the image files are stored in an asset folder in the working directory of the application. However, developers can also provide parameters to change tha path, name, and extensions of the image file.
When the create graphic functions are called, the sources of the image files are queued and loaded sequentially (while the game is loaded) or in the background (when the game is being played). Internally, FlevaR uses the Image object's onload event to determine when enough of the file has been loaded and can be displayed.
Deeper dive
To get a better understanding of how the graphics work (and are used in the engine), here is a sample snippet of the actual Graphic object in FlevaR:
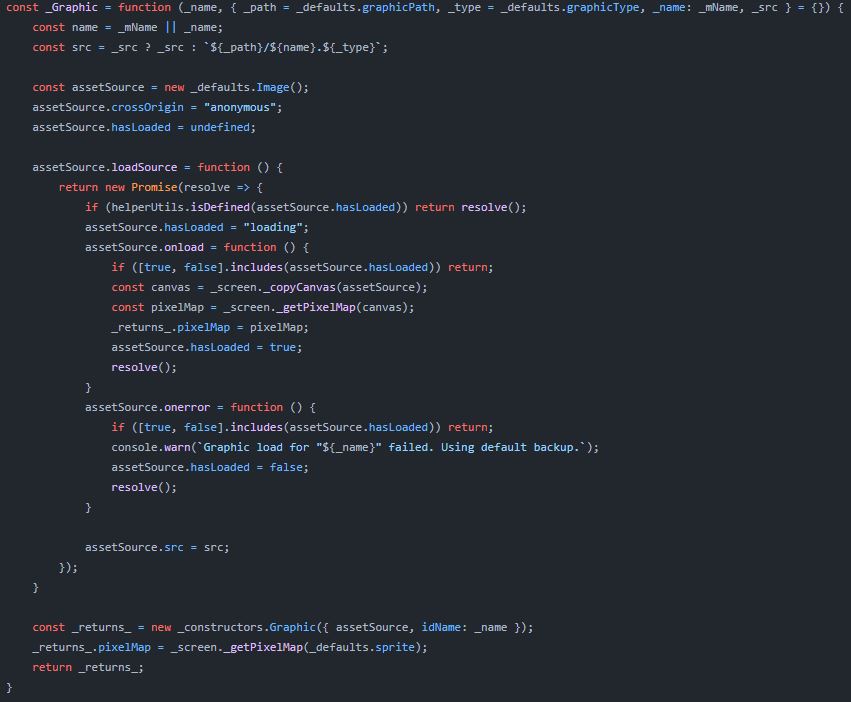
When the developer "creates" a Graphic, they can state the location and extension of the image with the _path, _name, and _type properties, or _src entirely.
_srccan also be used as a URL for images from other websites.
Initially, the Image object is created but the source is not immediately set. Instead, it is added to FlevaR's internal library of assets. A loadSource asynchronous function is created that sets the source of the image file which triggers the browser loading it. Upon engine load (or during synchronous or background asset checks), the loadSource promise is called for each asset.
You may notice additional properties such as
pixelMap. This property is a map of the individual pixels in theGraphic, which is cached internally for pixel-based collision detection.
When the asset is loaded, resources that depend on them will be able to use them; until then, resources that rely on these assets (flevaclips) display a default placeholder provided by the engine:

How to use it
The default syntax to create a graphic is createGraphic(name, config). The developer first creates a graphic, providing a name, and if necessary, the graphic's path in the working directory of the application:
Example
Create a graphic, using a png image called myGraphic from an assets folder in the same directory as the html file:
/* Within engine's onload */

createGraphic("myGraphic", { _name: "myGraphic", _type: "png", _path: "assets" }); // <- either

createGraphic("myGraphic"); // <- or
Note: In this scenario, the
configobject can be omitted, because if none are provided, by default,type = "png",path="assets", and thenamewould be what was provided by the developer.
Create a graphic, using a jpg image called kitten from an images folder in the same directory as the html file:
/* Within engine's onload */

createGraphic("myGraphic", { _name: "kitten", _type: "jpg", _path: "images" });
Create a graphic, using a free image from another website/url:
/* Within engine's onload */

createGraphic("myGraphic", { _src: "https://i.imgur.com/rQIk1oe.png" });
How I would improve it
Image Atlas
Currently, a new object is stored in memory for each image the game has.
One option I've considered is to create a large canvas that stores multiple images on it.
I have not checked whether one large file is better than multiple small files, but many engines go the route of storing multiple assets on one file.
The idea would be for FlevaR draw each image onto the canvas when they have loaded, and store those dimensions as occupied. That way, when a new image is created by the developer, it will be added to the canvas at an appropriate available space, or a new large canvas would be created if it can no longer fit.
Scripting Flow
An average game runs at 60 frames per second. That means scripts are executed 60 times per second, and then rendered just as fast to give the illusion and enjoyment of movement and gaming. Some scripts are called each frame, while others are only called based on a trigger, such as an object being loaded or unloaded. FlevaR provides a flow that developers can use to both maintain the simplicity of programming, and the flexibility of the declarative language involved through its APIs.
What influenced it
The architecture behind the way scripts work in FlevaR is inspired by ExpressJS and KnexJS. I do not recall what specifically inspired me, but I believe it was related to how function callbacks are handled. With ExpressJS, you define middlewares by passing functions, which are then run based on that request. Similarly, you pass functions as the parameters for other methods in FlevaR, that are then executed on a needed basis:
flevaclip.addScript(function myScript(self) {
    trace("Hello World");
});
The
myScriptfunction will be stored as a callback and executed on every frame.
How it works
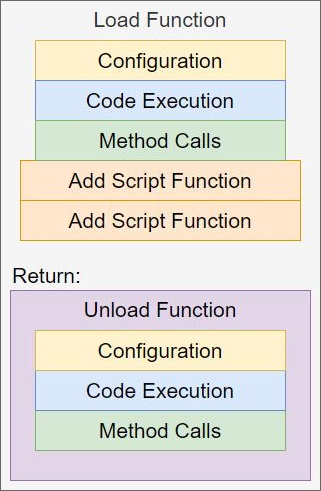
The main components in FlevaR are the engine core, the scenes, and the flevaclips. When the engine loads, a method is called to use a scene previously created. When that scene is being loaded, all flevaclips in that scene are also loaded. Afterward, the scripts in each scene/flevaclip are executed each frame, until another scene is loaded (or a flevaclip is removed). Before the other scene is loaded, the current scene first unloads (calling its unload script if it exists), and all current flevaclips are also unloaded. Then the next scene and its flevaclips are loaded.
General Application Lifecycle
// start
- Engine load
- Engine tick

// choose scene
- Scene load
- Flevaclip load
- Scene tick
- Flevaclip tick
- Scene tick
- Flevaclip tick
- Scene tick
- Flevaclip tick
...

// next scene
- Flevaclip unload
- Scene unload
- New scene load
- New flevaclips load
- Scene tick
- Flevaclip tick
- Scene tick
- Flevaclip tick
...
General Scripting Syntax
All scripts in the engine are passed as parameters for the engine to use as callbacks. Whenever they are executed, the engine passes the object specifically needed in that function.
For example:
- when the engine loads, the engine core is provided in the engine's onload function for the developer to create the game using core specific methods.
- when the scene loads, the scene object is provided in the scene's onload function that the developer can use to add flevaclips or execute scene specific methods.
- when a flevaclip loads, the flevaclip object is provided in the flevaclip's onload function that the developer can use to manipulate its properties and execute methods on that flevaclip.
- when a flevaclip's script is executed, the flevaclip object is provided in the callback function that the developer can use to manipulate its properties each frame.
Core Syntax
When the developer creates the engine, they define the configurations as well as the onload method of the engine: FlevaR(config, onload).
FlevaR passes the core object to this onload method, which is used to develop all the scenes, add all the assets, and create all the necessary scripts for the entire game.
Scenes Syntax
When creating a scene, the general format is to include a name parameter (string), and an onload parameter (function): createScene(name, onload).
Within the onload function, the scene object will be passed, which can be used to access all the methods provided by a Scene object. This load function is only executed once each time the scene loads. In this function, the developer can define all other flevaclips they want in the scene. If the developer wants scripts to run each frame, they add those scripts inside an addScript() method provided by the scene object.
Scene scripts created to run every frame are also passed the
sceneobject by the engine, so more methods can be called each frame.
Each onload function can optionally return a function that FlevaR will use for the onunload methods. When the scene is created, the onload functions are stored internally in the scene object's private inits (initializations) array. When the scene loads, the inits array is iterated and the functions are executed:
// scene's private load method
function load() {
    for(const init of inits) {
        const fini = init(scene);
        if(helperUtils.isFunction(fini) {
            finis.push(fini);
        }
    }
}
If a function was returned on each execution, they are stored in the scene object's private
finis(finalizations) array, similar to the syntax for code executed when a component is unmounted in ReactJS.
The scene.addScript(func) method adds those functions to the scene object's private scripts array. These functions are executed every frame:
// scene's private tick method
function tick() {
    for(const script of scripts) {
        script(scene)
    }
}
The
script(scene)executes the callback script and passes the scene object that the developer needs to access the scene's properties and methods.
When another scene has to be loaded, the current scene first iterates through its finis array to call the unload methods:
// scene's private unload method
function unload() {
    for(const fini of finis) {
        fini(scene);
    }
}
Similar to the Flevaclips Syntax, multiple onload functions can be created, all with their optional returned onunload functions.
Flevaclips Syntax
Just like the Scenes Syntax, flevaclips are created with a parameter for their onload function: createPrefab(name, props, onload).
Inside this function, the engine passes the flevaclip object that can be used to call all flevaclip methods. An optional return function is also available to be called when the user wants to perform additional functions when the flevaclip has been unloaded.
Multiple Onload Parameters
The first main goal of FlevaR was to define flevaclips once and use them as templates for future flevaclips. That way, all onload methods (as well as scripts and unload methods) from previous flevaclip templates would be called on subsequent flevaclips that were created from those templates. To get all these onload functions on the same flevaclip, FlevaR adds them to an inits array. For design flexibility, FlevaR also accepts multiple onload functions when adding the flevaclip, as subsequent parameters: createPrefab(name, props, onload1, onload2, onload3, ...).
Generally, game engines have one onload function for their entities, so I considered using a simple syntax such as
createPrefab(name, props, onload, onunload). However, due to the goal of reusing flevaclips as templates, I chose the route of allowing multiple onload functions, each with the option of returning a function that can be used as an onunload.
How it is used
The general flow of a flevaclip or scene with the flexibility of multiple callbacks is up to the needs of the developer.
Suppose the developer wanted a scene that does the following:
- Outputs "Hello scene" when loaded.
- Adds a flevaclip to the scene when loaded.
- Outputs "Running scene" every frame.
- Outputs "Goodbye scene" when unloaded.
The related code for the above requirements would be the following:
/* Within engine's onload */
createScene("myScene", function onload(scene) {
    // Outputs "Hello scene" when loaded.
    trace("Hello scene");

    // Adds a flevaclip to the scene when loaded.
    scene.addPrefab("myPrefab");

    // Outputs "Running scene" every frame.
    scene.addScript(function ontick(scene) {
        trace("Running scene");
    });

    // Outputs "Goodbye scene" when unloaded.
    return function onunload(scene) {
        trace("Goodbye scene");
    }
});
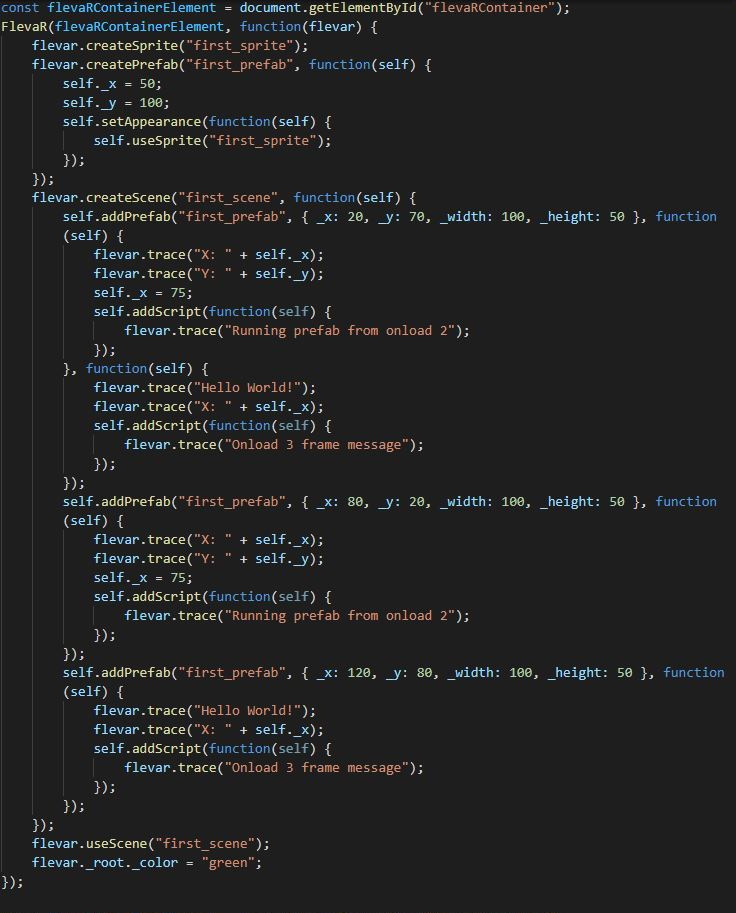
Suppose the developer wanted to create a prefab with two onloads that would be used in a scene, and does the following:
- Ouputs the x and y positions of the prefab in onload 1
- Set the x position to 75 in onload 1
- Outputs a message every frame from onload 1
- Outputs "Hello World!" in onload 2
- Outputs the x positions of the prefab in onload 2
- Outputs a message every frame from onload 2
The related code for the above requirements would be the following:
function onload1(prefab) {
    // Ouputs the x and y positions of the prefab in onload 1
    trace("X: " + prefab._x);
    trace("Y: " + prefab._y);

    // Set the x position to 75 in onload 1
    prefab._x = 75;

    // Outputs a message every frame from onload 1
    prefab.addScript(function ontick(prefab) {
        trace("Running prefab from onload 1");
    });
}

function onload2(prefab) {
    // Outputs "Hello World!" in onload 2
    trace("Hello World!");

    // Outputs the x positions of the prefab in onload 2
    trace("X: " + prefab._x);

    // Outputs a message every frame from onload 2
    prefab.addScript(function ontick(prefab) {
        trace("Onload 2 frame message");
    });
}

/* Within engine's onload */
createPrefab("myPrefab", { _x: 50, _y: 20 }, onload1, onload2);
The final output for the above code would be the following:
/* Output when the prefab loads */
// > X: 50
// > Y: 20
// > "Hello World!""
// > X: 75
// > "Running prefab from onload 1"
// > "Onload 2 frame message"
// > "Running prefab from onload 1"
// > "Onload 2 frame message"
// > "Running prefab from onload 1"
// > "Onload 2 frame message"
// > ...
You may notice that as callbacks, the onload functions could be coded separately and added to the parameters by name.
Regardless of this, the developer can still use the specific scene or flevaclip object that will be passed to it by the engine.
How I would improve it
Callback Hell?!
If left unstructured, creating scenes, flevaclips, and more can become what would seem like nested functions inside nested functions, or callback hell, which can reduce the readability of the source code. I would try to modularize components so that they can be used with better structure and code readability.
Encourage Better Code Practices
Readability can also suffer if variables used are vague or repetitive:
What is self??? Python?! Why is it used everywhere but refer to different things??
FlevaR docs can encourage better naming conventions or function structures to increase readability:
Existing Engines Inspiration
I initially wanted to simply create onClipEvent(load) and onClipEvent(enterFrame) APIs for FlevaR, similar to Adobe Flash AS2. However, that idea did not allow multiple functions for each event, as the current callback method I use.
Admittedly, when moving on from Adobe Flash, existing game engines were too overwhelming, so I did not get a thorough understanding of how their script flows work. Maybe what they do is similar to how FlevaR does it, or maybe it is drastically different (and better). Gradually, I want to make games with other engines as well and use that knowledge to better the developer experience of FlevaR, especially related to FlevaR's coding conventions and encouraged syntax.
Render Engine
The game engine loads, the players clicks a button (or presses a key), and they are (usually) taken to the menu screen where they can browse the options, check the credits, or play the game. For the player to know what button to press, and whether their interactions have an effect on the application, they need visual feedback. FlevaR also handles the rendering for the developer, so they only describe where each object is positioned, what size it is, and how it looks.
How it works (as well as how to use it)
All the flevaclips and scenes are drawn on the game screen for players to see, in the order of Scene, VCam, and then Flevaclip as shown in the execution system.
Render Context
Currently, FlevaR uses CanvasRenderingContext2D (context 2d) APIs to draw all in-game graphics. This API is used to draw shapes, images, text, and more.
Basic context 2d Example: Drawing a Square
To get a CanvasRenderingContext2D instance, you must first have an HTML5 <canvas> element:
<canvas id="flevarCanvas" width="600" height="500" style="position: absolute; left: 0px; top: 0px;"></canvas>
To get the canvas' 2D rendering context, call getContext() on the <canvas> element, supplying "2d" as the argument:
const canvas = document.getElementById("flevarCanvas");
const ctx = canvas.getContext("2d");
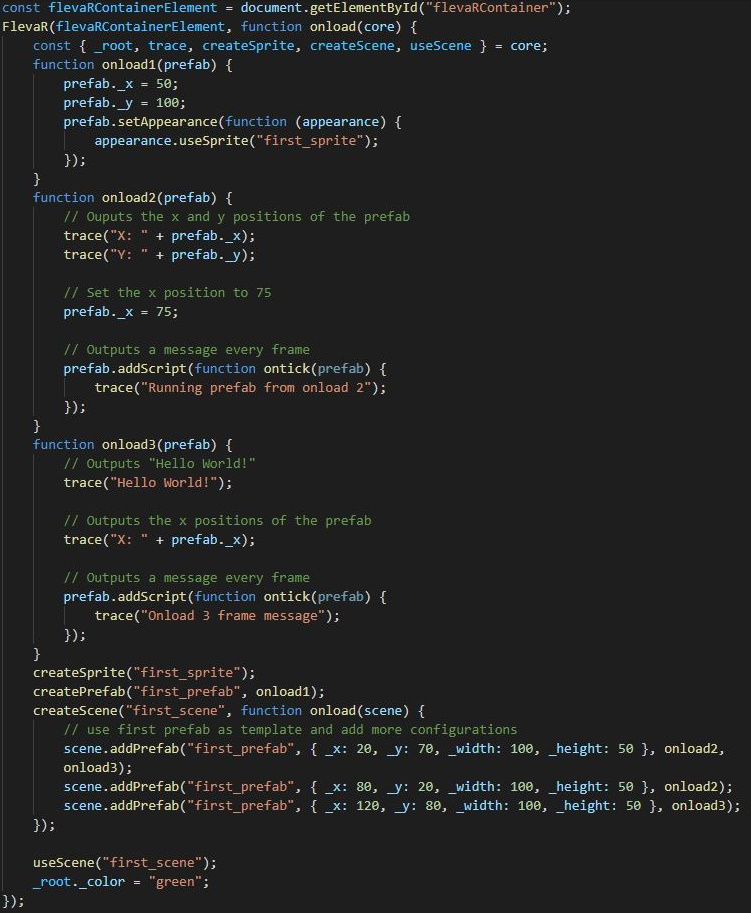
With the context variable, you can now draw anything. The following code draws a red rectangle on a blue screen:
ctx.fillStyle = "#3B4050";
ctx.fillRect(0, 0, 600, 500);

ctx.fillStyle = "#E44D26";
ctx.fillRect(100, 100, 200, 50);
ctx.strokeStyle = "white";
ctx.strokeRect(100, 100, 200, 50);
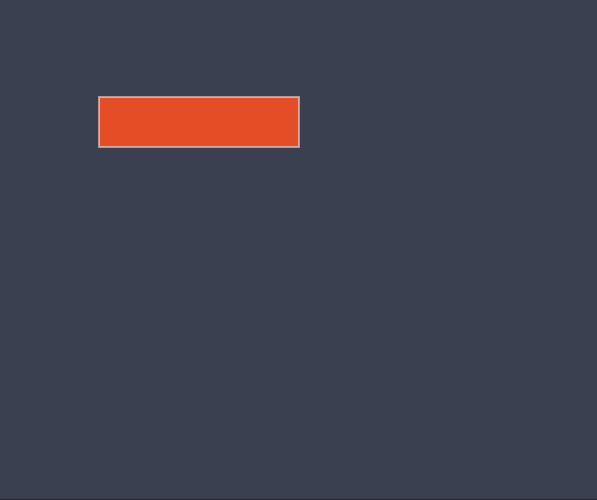
So far, simple right? However, the following additional code will draw another red rectangle, this time rotated 45 degrees about the mid point of the first red rectangle:
// positioning to origin
ctx.translate(200, 125);

// rotating matrix
ctx.rotate(Math.PI / 4);

// repositining to source
ctx.translate(-200, -125);

// drawing
ctx.fillStyle = "#E44D26";
ctx.fillRect(100, 100, 200, 50);
ctx.strokeStyle = "white";
ctx.strokeRect(100, 100, 200, 50);
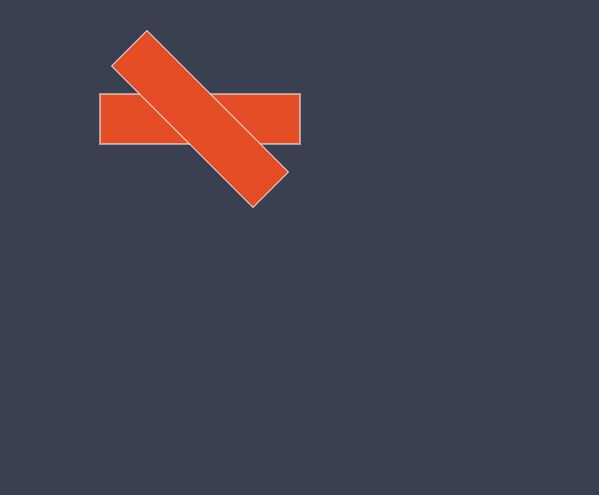
The translates are necessary because context 2d uses a transformation matrix that determines where an object is drawn. If you tried rotating without first translating to the origin of the shape, you may get unintended results:
// rotating matrix
ctx.rotate(Math.PI / 4);

// drawing
ctx.fillStyle = "#E44D26";
ctx.fillRect(100, 100, 200, 50);
ctx.strokeStyle = "white";
ctx.strokeRect(100, 100, 200, 50);
As you realize, keeping track of all the complexities required is a tedious and slow process for any developer. That is why FlevaR handles the drawings internally, and allows the developer to simply state the positions, sizes, and appearances of flevaclips.
Appearances
FlevaR has 4 appearances that can be used:
To use an appearance, a setAppearance() method is provided that accepts a function as a callback. In the callback, an appearance object (belonging to the scene or prefab) is passed and contains APIs for selecting the intended appearance based on the scene's or prefab's state.
self.setAppearance(function(appearance, state) {
    if(state.moving) {
        app.useSpriteSheet("moving_char");
    } else {
        app.useGraphic("idle_char");
    }
}
Graphic Appearances
Graphics refer to any static image the developer adds to the game, via the createGraphic() method:
createGraphic("myGraphic", { _name: "nice-image", _type: "png", _path: "assets" });
Any intended scene or prefab can then use the graphic:
/* Within set appearance function */
app.useGraphic("myGraphic");
Sprite Appearances
Sprites refer to images that are dynamically created by the developer, and stored for usage. They can be created using graphics, paintings, or other sprites:
flevar.createSprite("mySprite", { _width: 100, _height: 120 }, function(ctx, {_x, _y, _width, _height}) {
    ctx.fillStyle = "black";
    ctx.fillRect(_x, _y, _width, _height);
});
Any intended scene or prefab can then use the sprite:
/* Within set appearance function */
app.useSprite("mySprite");
Trivia: Sprites were once the only appearances available for scenes and prefabs; the developer had to add a graphic, convert it into a sprite, and then use it in an appearance method. Now, graphics can be used as appearances directly, but sprites are still kept for their dynamic creation possibilities.
SpriteSheet Appearances
SpriteSheets are sequences of images that are run on loop, giving the illusion of animation. As a simple explanation, the developer would set the size of spritesheets and how they look, using graphics, paintings, sprites, or other spritesheets. Then, FlevaR would crop and frame the generated images accordingly, and store it for use by scenes or prefabs:
/* Within set appearance function */
app.useSpriteSheet("mySpriteSheet");
For a detailed explanation on how spritesheets are defined, check the documentation.
Painting Appearances
Although FlevaR abstracts away the complexitites of rendering, some developers may still want the freedom and flexibility of using the context 2d APIs themselves. Thus, FlevaR provides "paintings" to accomplish this. Developers can define a "formula" (basically a function) which will be executed each frame, drawing the object according to the developer's code and values.
Furthermore, FlevaR sends the context, x, y, width, and height of the intended object to the painting function, so the developers can customize their drawings. As safeguards to prevent paintings from destroying the entire visual canvas screen, FlevaR first draws the painting on a separate canvas of matching flevaclip size, then paints that onto the main canvas screen. That way, any drawings that exceed the size of the flevaclip is automatically cropped.
Unlike Sprites and Graphics that are stored as images, Paintings are stored as
Scriptsthat are called every frame.
See the documentation for more details on paintings.
Appearance Association
When a use<Appearance> method is called, FlevaR associates that appearance with the particular scene or prefab. When the scene or prefab needs to be rendered, FlevaR checks the appearance type, looks for the matching appearance in its library, and after calculating the position on stage (as the usual case for prefabs), draws the image or runs the painting function. Currently, appearances are only changed if the state of the prefab or scene changes, taking after how components in ReactJS are only re-rendered when state changes.
In hindsight, this was a useless feature to use for FlevaR, as I could have simply used if statements and remove state entirely, but I need to do more research on that.
Appearance Rendering
FlevaR takes the complex matrix manipulation from context 2d off the hands of the developer, so they only state where an object is placed, and how the object looks. For each prefab, FlevaR internally sets the position of the canvas matrix, then draws the specific appearance. The benefit of providing flevaclips with predefined transform properties (_x, _y, _width, _height, _anchorX, _anchorY, _rotation) is that the engine can use these directly when calculating the matrix transforms:
function setMatrixPosition(ctx, props) {
    const offsetX = (props._anchorX / 100 * props._width);
    const offsetY = (props._anchorY / 100 * props._height);

    ctx.translate(props._x, props._y);
    ctx.rotate(numberUtils.degreesToRadians(props._rotation));
    ctx.translate(-(props._x + offsetX), -(props._y + offsetY));
}

function renderFlevclip(ctx, props) {
    ctx.save();

    setMatrixPosition(ctx, props);
    renderAppearance(props.appearance);

    ctx.restore();
}
As seen in the sample above, the engine saves the original matrix transform, calculates the transform the matrix needs to be at for the flevaclip, renders the flevaclip, and restores the matrix transform to prepare for the next flevaclip. All of this happens hundreds of times each frame, but all the player sees is the flevaclip object on the screen in its intended position, with its intended rotation, anchor, size, and appearance.
Additional Scaling
FlevaR also does more internally to accommodate resized game screens, increasing or decreasing the canvas matrix so other objects are scaled relatively, keeping consistency with the screen regardless of size (fullscreen, minimized, or otherwise).
How I would improve it
State Changes Appearances
FlevaR currently does not allow adding direct properties to flevaclips (such as prefab.myNewVar = 24) or modifying existing properties to invalid values (such as typing prefab._x = "Hello world!"). These decisions are to prevent any unexpected errors or engine crashes (since the internal engine will not know how to set the position of the context 2d matrix relative to a flevaclip's coordinates (props._x, or props._y) if it is a string instead of a number). However, I did know that developers would want to store additional custom values on different objects. Thus, flevaclips adopted state properties. Properties could be added or removed using changeState(), setState(), and useState(), methods. When these methods are called, a flag is set internally that marks the state object as modified. Then, after all scripts are ran and the render methods are being called, each flevaclip checks whether its state has been modified, and if so, calls the appearance function again, which would, depending on the definition, choose an appropriate appearance visual.
The purpose of changing the appearance only once when state changes was in an effort to reduce the potential resource intensive operations that could be performed if the developer naively sought to use<Appearance> on every frame:
/* Within flevaclip's onload */
prefab.addScript(function tick(prefab) {
    if(prefab.state.happy) {
        prefab.useSprite("happy_sprite");
    } else {
        prefab.usePainting("sad_painting");
    }

    if(Key.isDown(Key.X)) {
    // ...other code
});
If the above code was allowed, it would be run every frame and the appearance would be set over and over, even if the state did not change.
/* Within flevaclip's onload */
prefab.setAppearance(function (app, state) {
    if (state.happy) {
        app.useSprite("happy_sprite");
    } else {
        app.usePainting("sad_painting");
    }
});
prefab.addScript(function tick(prefab) {
    if (Key.isDown(Key.X)) {
        // ...other code
});
The above code will only change the appearance once state changes.
The Proposed Change
It would be convenient to modify the appearance directly from flevaclip events or code:
/* Within flevaclip's onload */
prefab.onClick = function(prefab) {
    prefab.useGraphic("active");
}
Rather than first having to set the appearance and then modifying state for the visual change to be reflected:
/* Within flevaclip's onload */
prefab.onClick = function(prefab) {
    prefab.changeState("isActive", true);
}
prefab.setAppearance(function (app, state) {
    if (state.isActive) {
        app.useGraphic("active");
    } else {
        app.useGraphic("inactive");
    }
});
A possible change would be to remove the setAppearance function/barrier, and leave the use<Appearance> methods available from the scene or prefab directly. To combat the potential increased intensive operations, FlevaR can simply ignore any use<Appearance> calls internally if the flevaclip is already using that appearance.
I'll have to do more research on this to determine a simplistic and developer friendly way to handle appearance changes.
Optimized Canvas Draws
Some of the biggest bottlenecks that cause drops in engine performance are translation calls, as well as ctx.save() and ctx.restore() calls being made for each flevaclip, for each frame, every second. Context 2d operations are not batched to the GPU, and are executed one by one, so while ctx.save() and ctx.restore() functions are useful, using them excessively slows down the engine.
Additionally, each transform function (such as rotate(), translate(), and scale()) performs a matrix multiplication, and multiple multiplications increase the operations that the browser needs to perform for each flevaclip, each frame. The current setMatrixPosition function performs a minimum of three separate transform calls (and more calls depending on some finer ommitted details). These transforms combined with the excessive use of ctx.save() and ctx.restore() decrease the speed of the engine at scale.
Optimizing the renderer would thus require minimizing ctx.save() and ctx.restore() calls, as well as transform calls (and lower matrix multiplications). I've recently been experimenting with an optimized context 2d drawing method that reduces the number of matrix multiplications required per flevaclip, and does not need ctx.save() and ctx.restore() calls:
function setMatrixPosition(ctx, props) {
    const offsetX = (props._anchorX / 100 * props._width);
    const offsetY = (props._anchorY / 100 * props._height);

    const yAx = -Math.sin(numberUtils.degreesToRadians(props._rotation));
    const yAy = Math.cos(numberUtils.degreesToRadians(props._rotation));
    ctx.setTransform(yAy, -yAx, yAx, yAy, props._x, props._y);
    ctx.transform(1, 0, 0, 1, offsetX, offsetY);
}

function renderFlevclip(ctx, props) {
    setMatrixPosition(ctx, props);

    renderAppearance(props.appearance);
}
There are less transform calls involved, which means less matrix multiplications. The alternatives would be to use trigonometry to calculate, as shown in responses to this stackoverflow question, as well as this very helpful article. I was able to modify the code to support flevaclips of any x, y, width, height, anchor, rotation, and even scale.
Disclaimer: Ideally I could use enough trigonometry to only need the
setTransform()call (and not the additionaltransform()call) but due to my own math limitations, the code above was what I've currently ended with.
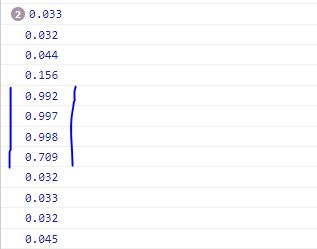
The advantage of this form of canvas rendering is that it can render over 1500 objects at 120fps, and over 3000 objects at 60fps:
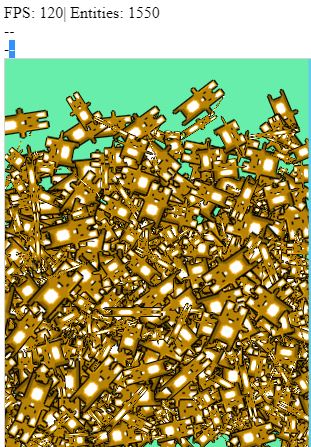
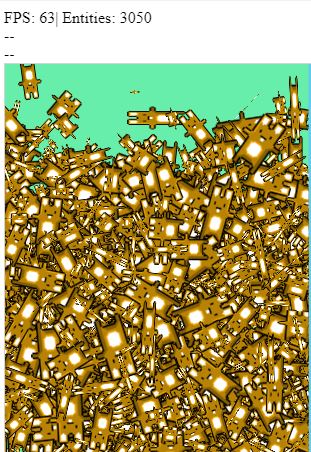
Converting to WebGL Render Context
Browsers also provide a Web Graphics Library for rendering high performance interactive graphics without the use of plug-ins. Unlike CanvasRenderingContext2D, WebGLRenderingContext takes advantage of hardware graphics acceleration on the player's device. All this means is that WebGL is very fast. With it, one can render thousands of flevaclips per frame, at 120fps.
However, my personal knowledge of WebGL is minimal, so I could not develop a WebGL renderer for FlevaR.
Using PixiJS
WebGL, while powerful, is very complex. Fortunately, many libraries exist that abstract away the complexities. PixiJS is the most popular and flexible 2D WebGL renderer, so I have considered using it instead of developing a WebGL renderer myself.
So far, everything in the engine has been created by me, based on what I've gradually learnt, and I avoided depending on external libraries for my code to work. However, if I was to begin using a WebGL renderer for an increase in speed and flexibility of FlevaR, I may consider PixiJS.
WebGL/PixiJS Caveat
Currently, because FlevaR uses context 2d, I can allow developers to create their custom visuals for flevaclips, through the use of Paintings where the simple context 2d API is available for them.
If I switch to WebGL, there are no easy APIs they can use as Paintings, which complicates the possibilities of FlevaR's flexible render engine when you consider current alternatives:
Use a context 2d canvas for drawings, then render it as a WebGL texture.
The problem with this is thatPaintingsare executed each frame, since depending on the code the developer uses, values can be changed. The process of drawing to a 2d canvas, converting to WebGL, and drawing it on the screen, for each painting on each frame, would create a bottleneck that WebGL is supposed to solve to begin with; thoughGraphics,Sprites, andSpriteSheetswill be drawn faster,Paintings, will be slower.Develop a similar API to context 2d that works in WebGL, and allow the developers to use that; to them, the syntax of
Paintingswill remain the same, and all appearances will benefit from the faster WebGL rendering.
Unfortunately, although existing libraries exist that try to solve this problem (canvas-webgl,webgl-2d,Canvas2DtoWebGL), they were never able to implement all context 2d APIs, they became just as slow as canvas to achieve similar APIs, and they were all discontinued over 5 years ago.Develop a new API the developer can use. PixiJS already provides an API that can be used to draw shapes. However, that requires the developers to learn a new syntax.
This may not be a problem currently, since FlevaR does not have many developers, but it still is something to greatly consider; I'd like to keep the engine as simple as possible for developers.
Data Storage
One of the most exciting challenges in a game is beating a highscore or collecting the most coins in a level. To keep a player coming back to your game, you can't have the game progress resetting every time the game is reloaded. For that, it is important that the game saves the progress, and loads it at a later time.
Just like other game engines, FlevaR provides an API the developer can use to allow for storing and retrieving data, called SharedObjects.
What influenced it
The storage APIs were heavily influenced by the ActionScript 2.0 APIs provided by Adobe Flash. When developing the APIs, I used these- two websites as reference.
How it works
Conveniently, all major browsers provide local storage and indexedDB that can be used to store and retrieve data on the user's device.
For efficiency and optimization, the data is often stored in the application's memory and written to storage when explicitly called by the developer. Internally, the method of storage that the engine uses (separate from the API it provides to the developer) is called a storage driver. FlevaR's SharedObjects is an abstracted wrapper around an indexedDB driver, and it also uses a localStorage driver as a fallback, where applicable.
localStorage Driver
FlevaR uses the simple localStorage.getItem, localStorage.setItem, and localStorage.removeItem functions. However, by default, each application can only store up to 5MB of data.
This limit can be increased by the application user, but FlevaR tries to provide as much as possible without the user having to worry about size constraints.
indexedDB Driver
The IndexedDB API allows rich query abilities and a larger maximum storage size than localStorage; only limited by the device's storage capacity, and operating system.
I.E. It is not something the player has to worry about. For this reason, FlevaR uses
IndexedDBas storage as the default driver.
However, it is very complex for beginner developers. For example, you have to open a database, create an object store, start a transaction, make a request, wait for an operation, etc etc. I took the task of learning it enough to abstract that complexity away and provide it as a driver for the FlevaR engine. Thus, the developer only needs to focus on SharedObjects, and the engine does the efficient complex storage for them.
To thoroughly test this driver, I also referenced the API (and source) of a JavaScript library called localForage.
SharedObject Module
When a sharedobject is created, the developer gives it a name. Internally, an object is created in memory with the same name, and is persisted throughout the duration of the game. Depending on the code from the developer, this object is either stored to the device (flush), or emptied and deleted (clear). If multiple sharedobjects are created with the same name, the existing reference in memory is returned and shared at that variable location.
How to use it
Creating a SharedObject:
To start saving data, the developer first creates a SharedObject:
const mySharedObject = await SharedObject.getLocal("my_sharedobject");
All data to be saved is then stored in a data object:
mySharedObject.data.username = "Bob";
mySharedObject.data.age = 23;
mySharedObject.data.hobbies = ["brawling", "building", "reading", "mining"];
Saving a SharedObject:
To store the data to the device, the developer has to explicitly call the flush method of the sharedobject:
await mySharedObject.flush();
All the variables in the data property will then be stored.
Deleting a SharedObject:
To remove the data from the device, the clear method of the sharedobject can be used:
await mySharedObject.clear();
//The reference to `mySharedObject` is still active, but it no longer exists in memory, and `mySharedObject` is now empty.
How I would improve it
Memory Storage
Both localStorage and indexedDB APIs do not work on browsers that disable cookies.
I only discovered this when playing one of my games from an iframe in an incognito tab.
In the current version of FlevaR, localstorage or indexedDB would cause the entire game to crash when the engine tries to internally access them on browsers where they are blocked.

To avoid this, I can implement a third memory storage driver as a fallback, that only stores the data until the application is reloaded or exited.
This is definitely a disadvantage for players that disable cookies, so I can also create a default warning that gives them a message such as "Enable cookies to allow saving/loading to work."
Extensible Storage Driver
FlevaR aims to also run as desktop or mobile applications, and those platforms may require different storage drivers to store data on the device. For example, localStorage or indexedDB does not work in NeutralinoJS desktop applications. However, it does provide a storage API that can be abstracted and used as a driver. Allowing FlevaR to extend the StorageObject's internals to support other APIs allows flexibility regardless of platform.
Developers that have enough knowledge to provide a wrapper of their platform's storage API to the SharedObject can probably use that storage API for their games directly; however extending SharedObjects to support it internally can still provide flexibility to other developers that do not want to worry about each platform's specific storage APIs, and just wants to extend FlevaR's engine to support it.
Uncaching Idle Storage
Currently, all SharedObjects persist in memory until the application has been closed. That means even if the developer destroyed the shared object variable reference, it is still available in the engine, taking up space in memory. I am considering providing a free or unlink method that the developer can use, which will not delete the data from storage, but only clear it from memory.
If the developer wishes to use that object again, they will have to call the
getLocalfunction once more.
FlevaClips
Flevaclips are the main manipulative entities in FlevaR. They are pre-configured/pre-fabricated game objects that can be defined once and reusable in whatever scenes necessary. When the game loads, many of the visuals (buttons, sliders, game characters and enemies, textfields and more) are flevaclips.
What influenced it
Before flevaclips existed, Prefabs was the main name for entitites. However, after research and implementing Textfields, I needed a term to group them both, since they had similar positions and methods. Thus, the term FlevaClip came about, heavily inspired after Adobe Flash's MovieClips.
How it works
The main properties of all flevaclips include _x, _y, _width, _height, _rotation, _anchorX, and _anchorY. The two current flevaclip types are Prefabs and Textfields
See more information on flevaclip properties here (prefabs) or here (textfields)
These properties define the space the flevaclip occupies on the stage. For example, if a flevaclip's _x and _y positions are at half the stage, with 100 pixels _width and _height, no _rotation, and offsets/anchors of 0% of the flevaclip, it will appear from top-left to bottom-right in the center of the stage:
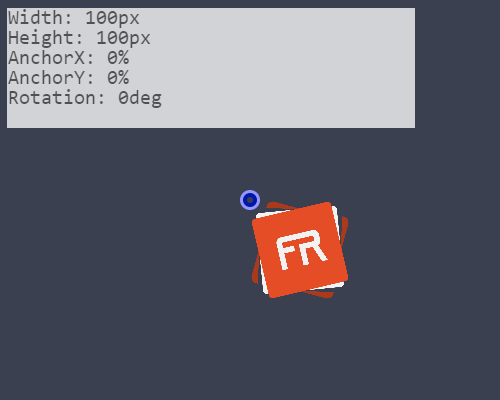
However, if the offsets/anchors are 50% of the flevaclip, it will seem centered on the stage:
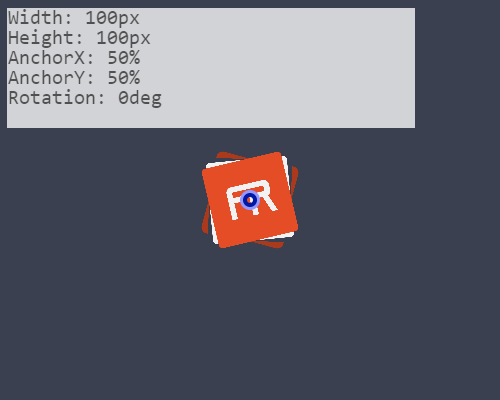
As assumed, if the offsets/anchors are 100% of the flevaclip, it will seem centered from the bottom-right to the top-left of the stage:
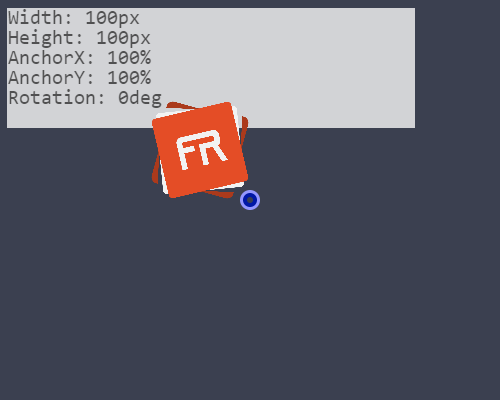
The rotation of flevaclips are also relative to the anchors:

And the width and height of the flevaclip also stretches relative to the anchors:
The powerful thing about the flevaclip is that it contains enough information the developer would need to describe the transform of each object on the stage. The developer simply defines where the flevaclip is (the shape and positions), and the engine renders accordingly (as well as determine if the mouse touches the flevaclip in that position, and more).
How to use it
To create a flevaclip, you call the createPrefab or createTextfield method, depending on the desired type of flevaclip:
createPrefab("first_prefab", function onload(prefab) {
  // ...other code
});
To manipulate the properties of the flevaclip each frame, you call the desired methods and change the desired properties in a script added to the prefab:
const speed = 5;
function prefab_movement(prefab) {
    if (Key.isDown(Key.LEFT))
        prefab._x -= speed;
    else if (Key.isDown(Key.RIGHT))
        prefab._x += speed;
    if (Key.isDown(Key.UP))
        prefab._y -= speed;
    else if (Key.isDown(Key.DOWN))
        prefab._y += speed;
}
function border_collide(prefab) {
    if (prefab._x < (prefab._width / 2))
        prefab._x = (prefab._width / 2)
    if (prefab._x > _root._width - (prefab._width / 2))
        prefab._x = _root._width - (prefab._width / 2)
    if (prefab._y < (prefab._height / 2))
        prefab._y = (prefab._height / 2)
    if (prefab._y > _root._height - (prefab._height / 2))
        prefab._y = _root._height - (prefab._height / 2)
}

/* Within prefab's onload */
prefab.addScript(prefab_movement);
prefab.addScript(border_collide);

See more information on prefab methods here
How I would improve it
Removing Getters and Setters
Currently, many flevaclip properties are wrapped as getters and setters to control their limitations for the engine. For example, the _anchorX and _anchorY properties are locked between 0 and 100, and if the developer tries to set it to anything other than a number, it is set to 0:
Object.defineProperties(props, {
    _anchorX: {
        get() { return __anchorX },
        set(_val) {
            __anchorX = numberUtils.clamp(parseFloat(_val), 0, 100);
        },
        enumerable: true,
        configurable: false
    },
    // ...other props
});
Another example is that it allows the _rotation property to remain between -179, and 180, similarly to what is done with Adobe Flash's MovieClips. While convenient, this slows down the engine at scale (when hundreds of flevaclips exist at the same time).
Removing the getters and setters for the properties will remove the protection provided (meaning more things would break if the developer does something like prefab._x = "Hello world"), but it will increase the speed at scale.
An alternative would be to enable the protection as a separate internal method in the main loop cycle after the scripts are run, but before the objects are rendered. However, that option is open for experimentation, since developers can still break things during the script phase...
Re-Imagining Textfields
Currently, browsers only provide input or textarea elements for entering text, which does not allow layering within the canvas element. Thus, all input boxes would appear above the canvas. FlevaR uses a custom developer textbox that allows the player to type directly within the canvas:

The advantage of this is that it allows input textfields to act like flevaclips with flexible depths, rotations, and more. The disadvantage is that it does not work well for RTL text, non-latin characters, or mobile phones. This limitation is due to my own knowledge of trying to re-implement the feature in canvas instead.
After following along with CodeMirror's research and resources on how they implemented textfields for both desktop and mobile, I was made aware of the larger gap between what can be possible with canvas on mobile. Rather than try to re-develop textfields to support touch and drag for mobile highlighting, copy/pasting, RTL text, non-latin charactes and emojis and more, I'm considering removing the custom input in canvas and leaving it up to what is already provided by browsers.
CodeMirror Research References:
- Browser Input Reading
- CodeMirror Internals
- CodeMirror Version 6
- CodeMirror Design Doc
- CodeMirror System Guide
- CodeMirror Extensibility
- Canvas Textarea Test
FlevaR will still have layered textfields, but when they are selected, an element will appear. The player will enter their text there and it will be populated into the layered flevaclip textfield. This would work on mobile as well, since elements already have all the options necessary for selecting text, copy/pasting, prompting a virtual keyboard, and more.
This is similar to how certain game engines such as the WickEditor handles text in elements.
Additional Flevaclip Types
Game Engines like GDevelop have multiple objects, such as sprites, particle emitters, textfields, tiled sprites, tilemaps and more. Rather than one object trying to support multiple options like FlevaR (static/unchangeable text, dynamic/modifiable text, input/typable text), which increases the size for each flevaclip even when those values are not being used, separating them into multiple object types can remove the bloat and let each object type serve one specific purpose. With multiple types, the engine will also be able to create optimizations, such as only rendering the visible tiles in a tiled sprite, rather than rendering every single tile if only a piece of the sprite is visible.
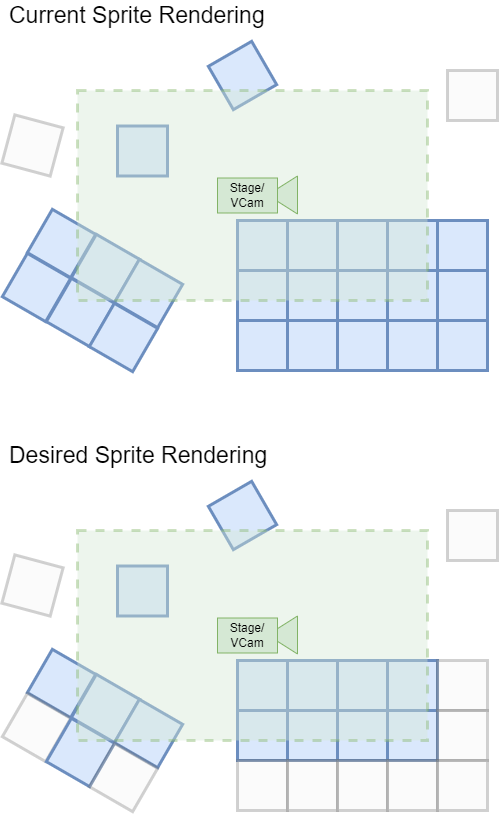
Currently, FlevaR renders the entire flevaclip even if only a piece is being displayed.
Extensible Flevaclip Types (Plugins)
With Adobe Flash, multiple components can be created and imported which allow additional flexibility of developers that are not provided by the engine. Entending flevaclips will allow developers to create their own flevaclip presets, methods, and render definitions, and make them engine native or distributable to other developers.
The goal would be, specifically for tile-bsaed flevaclips, to only render displayed tiles (blue) and ignore the others (grey).
Scenes
Generally, after the game has loaded, the player will first meet the menu screen:
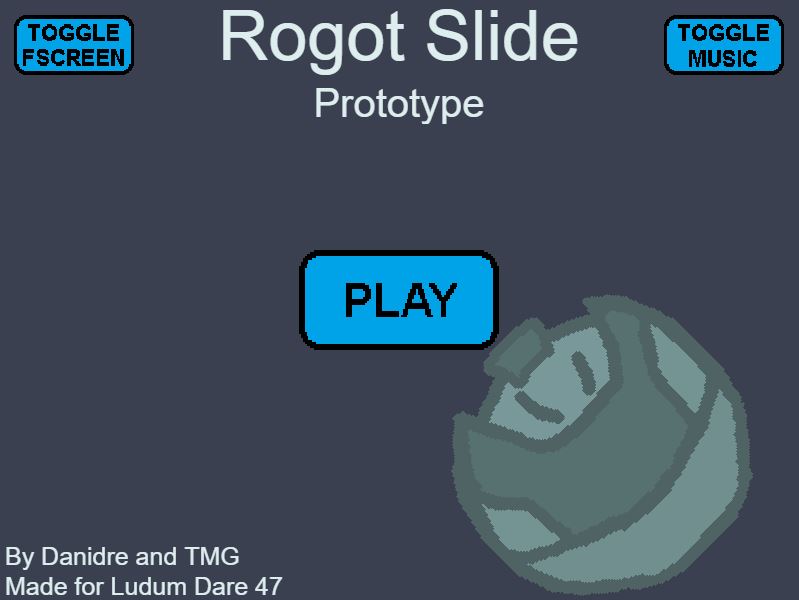
After that, they can navigate to the options screens, credit screens, game screens...different sections necessary for a game.
In previous games I made (before developing the game engine), these different screens were managed by booleans or other state logic:
const states = ["menu", "options", "level1", "level2"];
const currentState = 0;
const paused = false;

if(states[currentState] === "menu") {
    // spaghetti menu code
} else if(states[currentState] === "options") {
    // spaghetti options code
} else...
However, managing the individual logics for adding and removing objects and functionality for each individual screen was always a tedious task. In FlevaR, I sought to remove that tediousness by "letting the engine handle it". Similar to existing game engines, I decided to use Scenes.
What influenced it
"Scenes are to FlevaR what frames are to Flash!"
- Danidre
This was the first thought process when developing FlevaR. Adobe Flash used frames for all their animations, and developers used those frames as different game scenes where desired.
However, the first workflow of FlevaR was mostly with code in a text editor, rather than a visual editor like Adobe Flash. Due to this, I thought it very tedious trying to mimic Flash frames with code alone: having some flevaclips stuck in one frame; having others extending over multiple keyframes; having more flevaclips in higher or lower layers, each with their own nested crazy frame scenes:
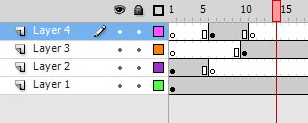
I decided to separate screens by the use of Scenes instead of frames. The disadvantage of this is that there were no layers, but the advantage was that it was simple for developers to...develop and use.
How it works
Internally, all scenes definitions are stored within the engine's library. When the developer decides to use a scene, it is loaded, executing all onload scripts, and adding all associated flevaclips defined in the onload scripts. Those flevaclips are then loaded as well and soon all tick scripts are executed each frame.
When the developer decides to use a new scene, the engine first unloads the current scene (as well as its associated flevaclips), then gets the next scene from its library and repeats the load process again.
How it is used
Creating a Scene
To create a scene, the developer calls the createScene(name, onload) method. Within the scene's onload functions, the develop declares all flevaclips they want associated with that scene, as well as the associated game logic and functionality required:
createScene("menu_scene", function onload(scene) {
    // ...other code
    scene.addTextfield("large_text", { _text: "Mountain Bell Ski" });
    scene.addPrefab("play_button");
    scene.addPrefab("help_button");
    scene.addPrefab("fullscreen_button");
    scene.addPrefab("reset_button");
    scene.addTextfield("credits_text");
});
createScene("help_scene", function onload(scene) {
    scene.addTextfield("help_text");
    scene.addPrefab("menu_button");
    // ...other code
});
The code above assumes the prefabs were previously created and defined using
createPrefab()or similar methods.
Using a Scene
To use a scene, the developer calls the useScene(name) method:
useScene("help_scene");
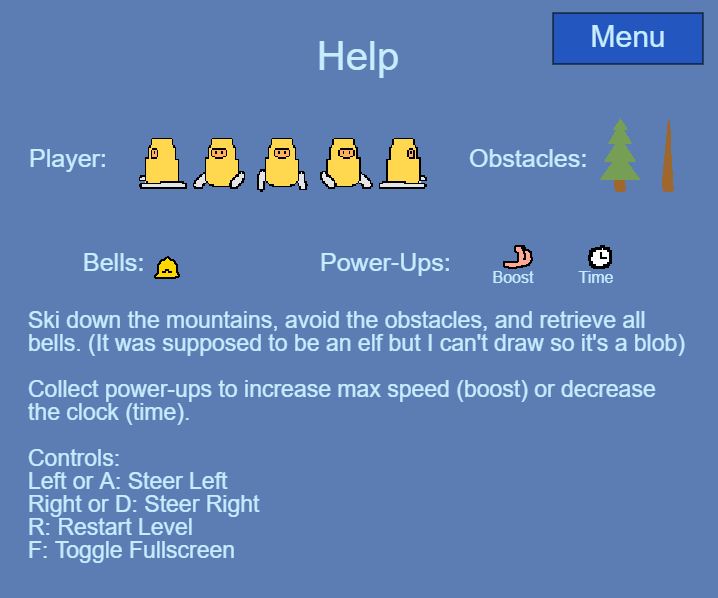
How I would improve it
Layers in Layers
Currently, the engine can manage scenes, and scenes can manage flevaclips. Scenes cannot manage nested scenes, and flevaclips cannot manage nested flevaclips. Along with the complexity it would add for a developer, it was also out of the scope of my personal knowledge, since I did not know how to render flevaclips nested in flevaclips if the parent flevaclip had modified dimensions:
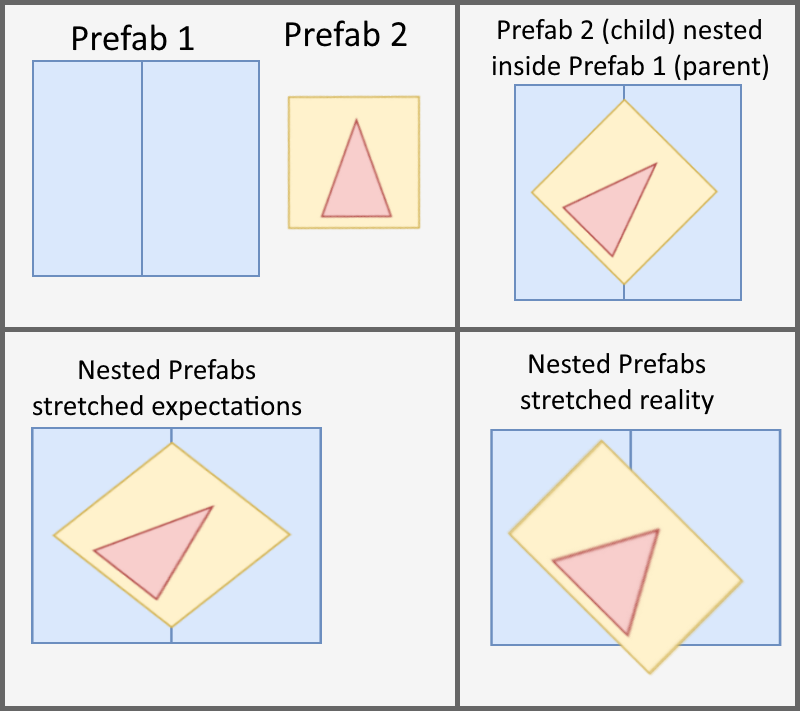
I also did not know how to perform mathematical calculations to determine if the mouse pointer was colliding with a nested child flevaclip, if it was distorted based on its parent's dimensions.
It has always been a goal to allow layers in FlevaR. I've recently learnt more about matrices, so this might be a possibility soon.
A Scene within a... Scene?
For game engines like Godot, all objects/nodes are basically scenes, and can have more scenes in them. I have not personally tried Godot, but the idea does sound like one I can explore with FlevaR.
Visual Editor (and Frames!)
Currently, I'm working on a Visual Editor for FlevaR that allows developers to mix scripting with dragging, dropping, drawing, and more, all within the browser:
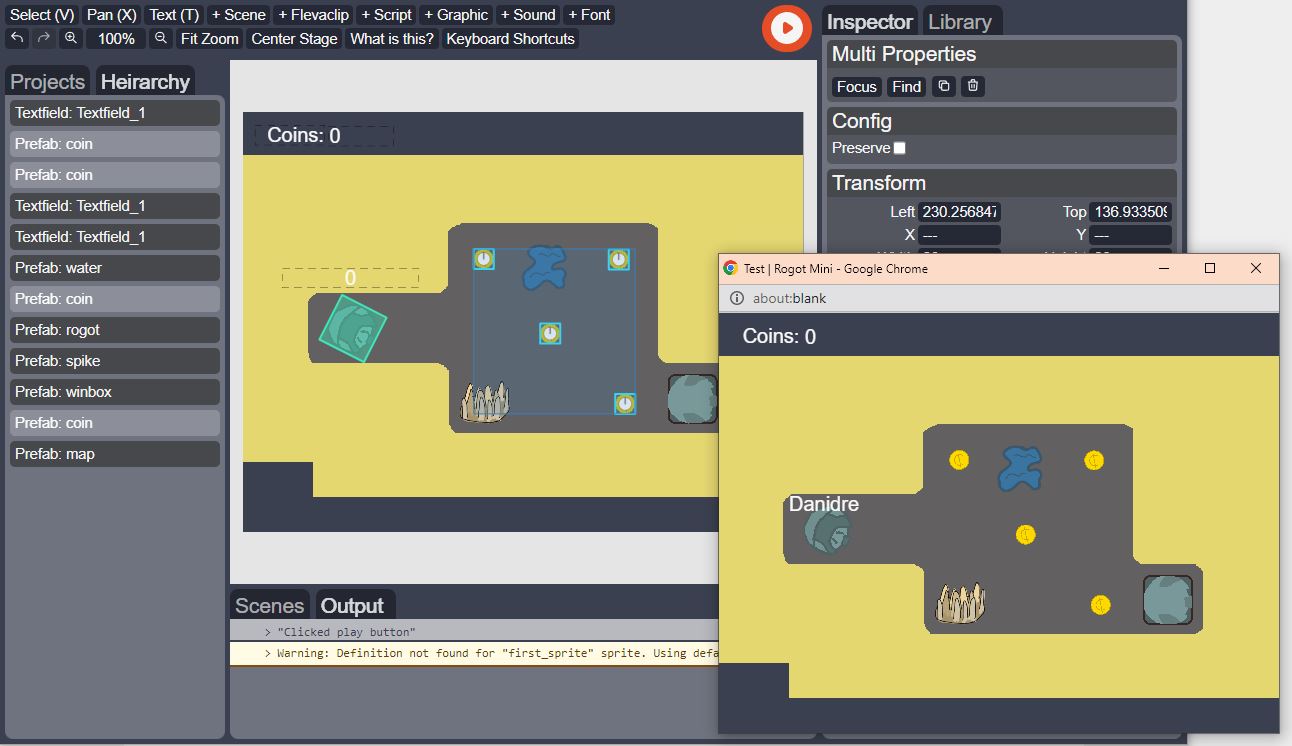
There's no secret to the editor: it basically generates the associated FlevaR code required for a game.
Hopefully, even if I add complexity with layers, the visual editor will hide the tedious coding from the developer so they can have a better overall user experience. Maybe I will also be able to use frames instead of scenes?
Virtual Camera
One of the cool features a game can have is a virtual camera that follows a player:
These allow the developer to create more objects on one screen, and does not limit the viewable area of the player to only that screen:
Some game engines provide virtual cameras out of the box (Unity), and other game engines require additional components from developers (Adobe Flash). FlevaR provides a virtual camera that the developer can easily manipulate, with similar properties as flevaclips (_x, _y, _width, _height, _anchorX, _anchorY, _rotation), and additional properties (_xScale, _yScale).
Trivia: The virtual camera took me over 5 months (October 2020 - March 2021) of active and inactive development, to successfully complete!
How it works
The idea of VCams in FlevaR is to capture what is directly under the virtual camera in the current scene, and project that onto the viewable screen for the player. The canvas element does not resize along with the VCam, but instead the contents of the scene are stretched to fill the screen.
In order to accomplish this, FlevaR internally transforms the context 2d matrix such that all future positions set by flevaclips are relative to the VCam's projection.
Visual Examples
The following samples will give a better understanding of how the dimensions of the VCam are projected onto the resulting screen:
Suppose there is a 400 x 400 pixels video game with a colourful background:
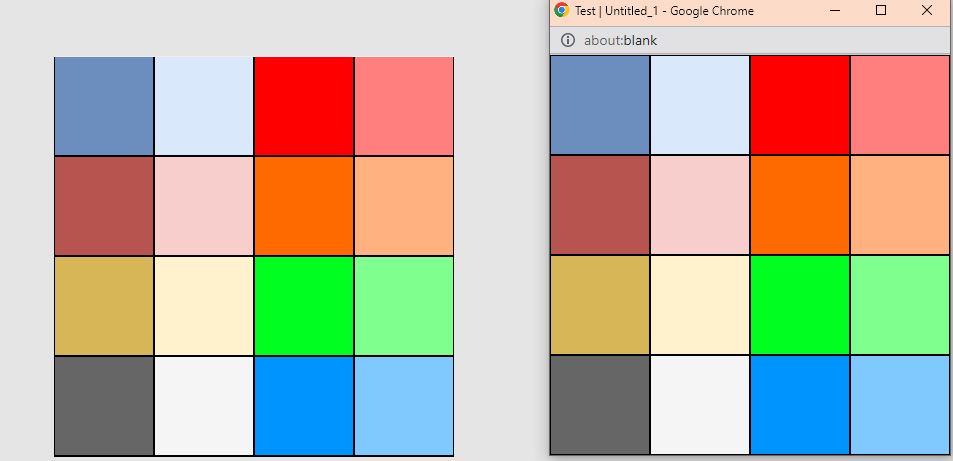
If you add the default VCam, the developer would recognize no change:
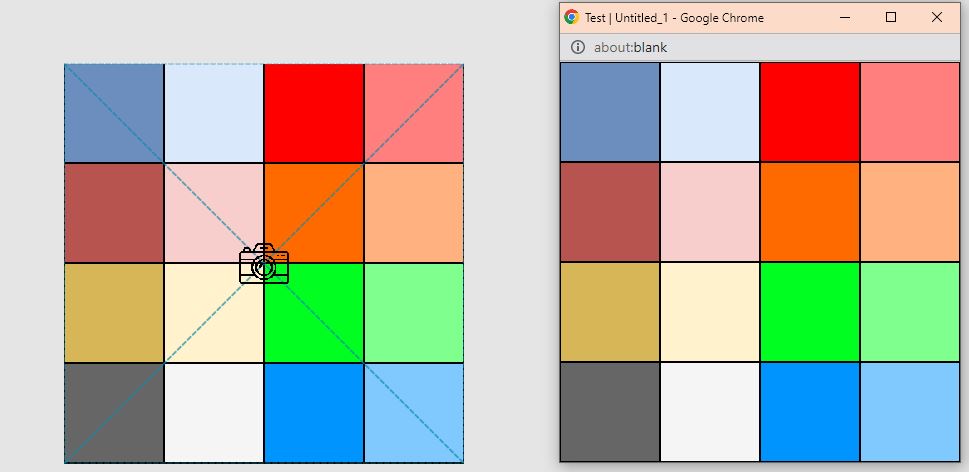
By default, a VCam is created with the same size as the canvas screen (in this case, 400 x 400 pixels), and the anchors at 0 (top left of the VCam).
To demonstrate positioning, suppose you set the VCam's _x to 150 and _y to 120. The following results:
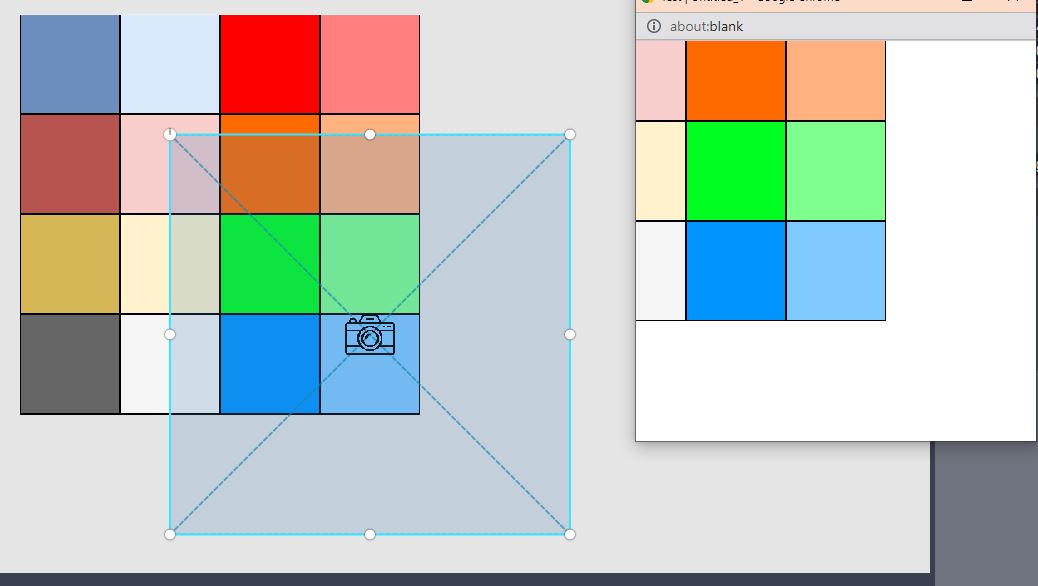
The entire context 2d matrix is shifted so you only see the pixels that the VCam is on top of.
Let's explore more, this time setting the anchors of the VCam to 50% (the center of the VCam):
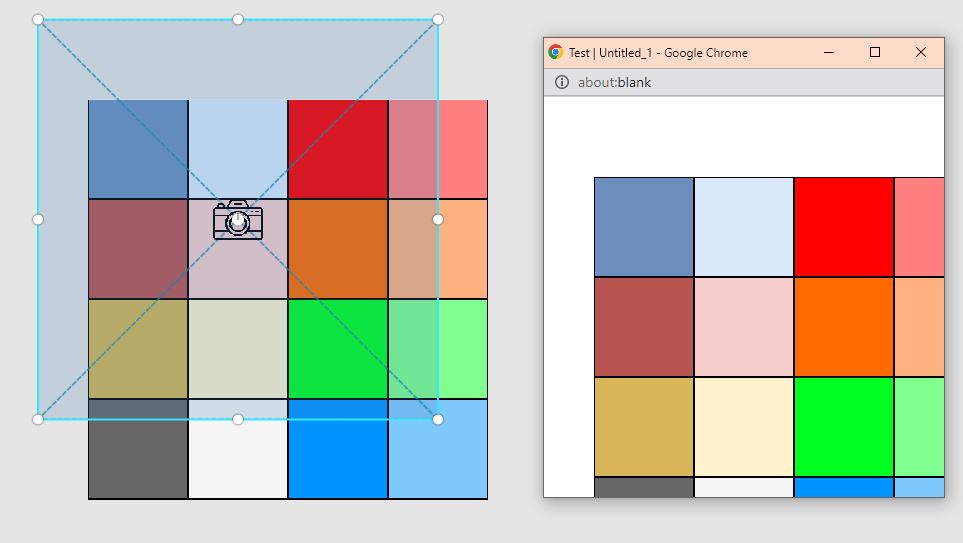
Although the x and y positions haven't changed, the anchors change the center of VCam rotation.
Rotations...let's see what would be projected if the VCam is rotated 45 degrees clockwise:
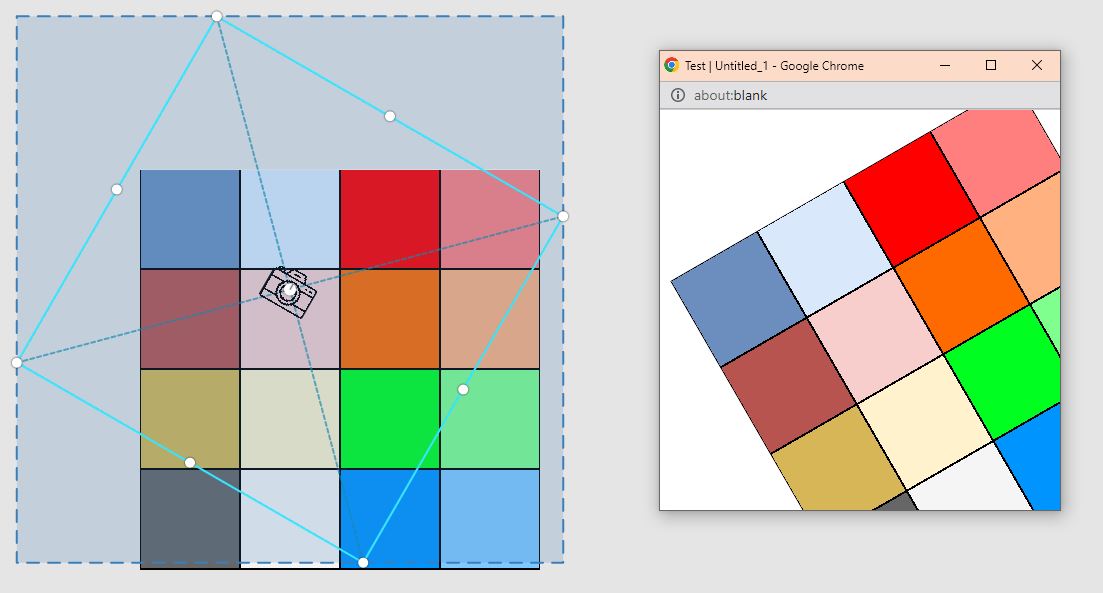
Since the canvas element itself cannot be rotated, the entire game screen is rotated to reflect how it would look upright to the player.
Similarly, if we manipulate the size of the VCam, the projected view will also be stretched to fit. Let's change the _width and _height of the VCam to 250 pixels each:
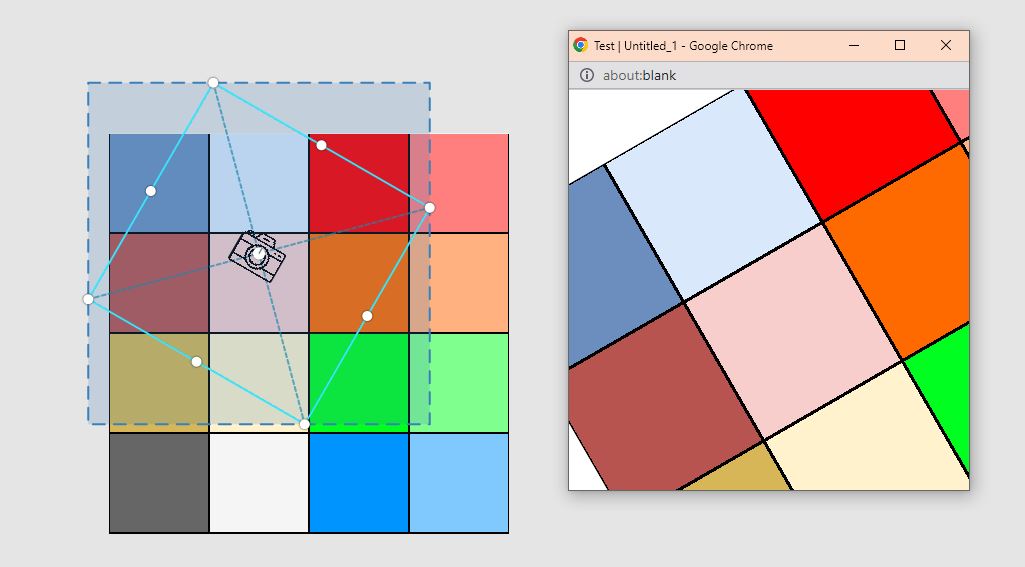
With a smaller VCam, a smaller portion of the scene will be projected onto the screen, making the objects look larger.
The inverse can be observed as well; with a larger VCam, more of the scene would be projected onto the screen, making the objects seem smaller. The following example uses a VCam with 500 in size, 50% anchors, and no rotation, positioned in the center of the stage:
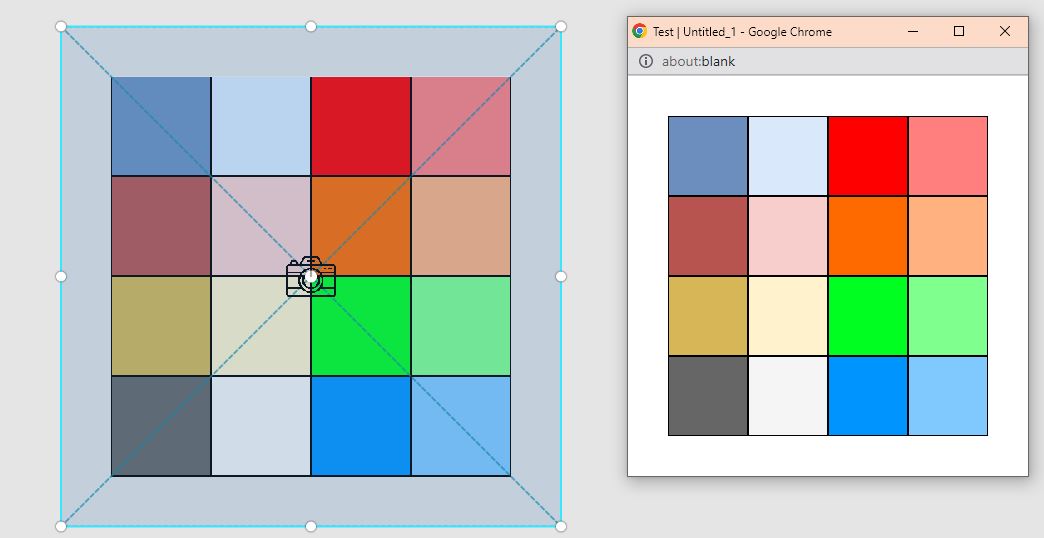
Things get weird if you resize the VCam to a different aspect ratio than the game screen.
A 200 x 400 VCam on the 400 x 400 screen looks horizontally stretched:
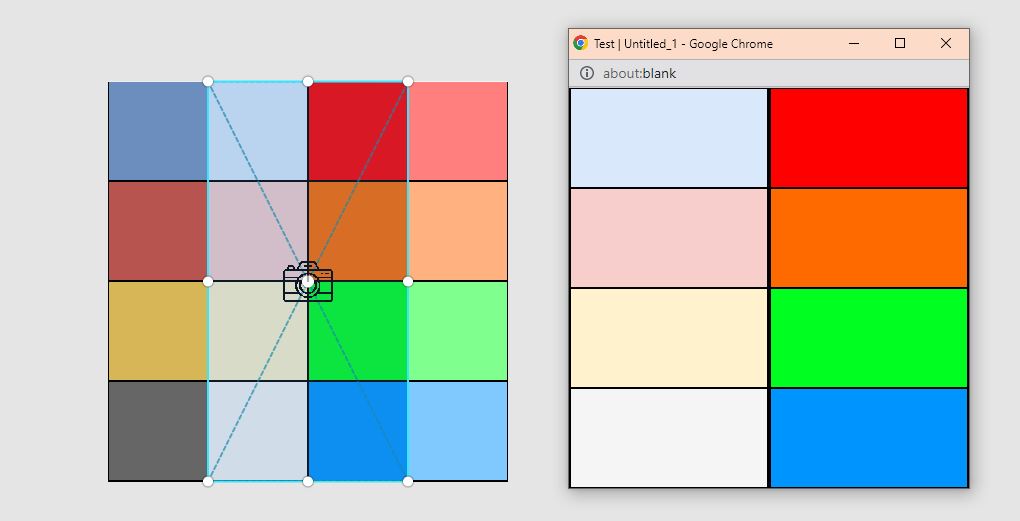
Similarly, a 400 x 600 VCam on the 400 x 400 screen looks vertically stretched:
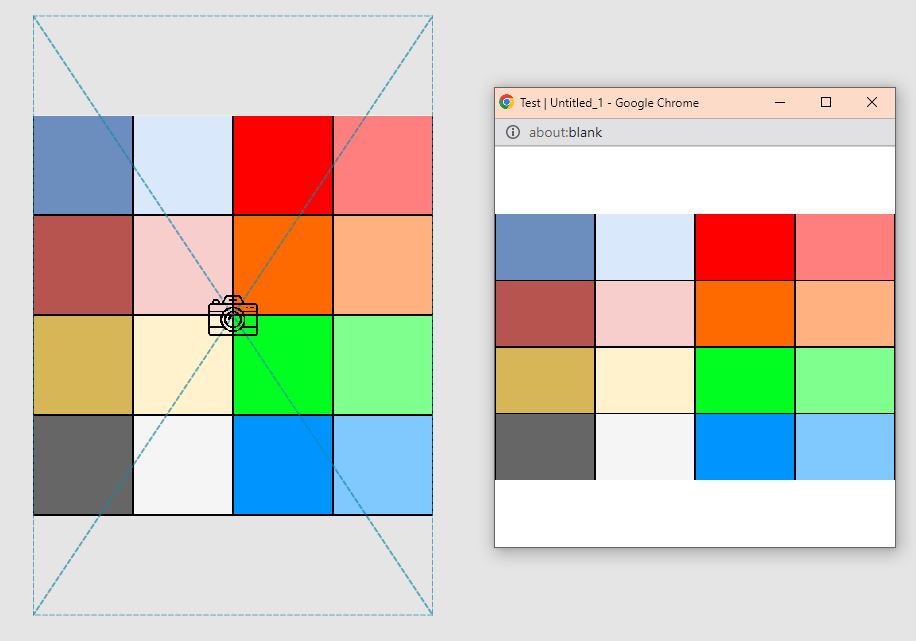
The results get even more questionable when you combine rotations with differently scaled VCams.
Here is the 400 x 400 stage with a VCam centered, with 200 width, 300 height, and rotated 60 degrees:
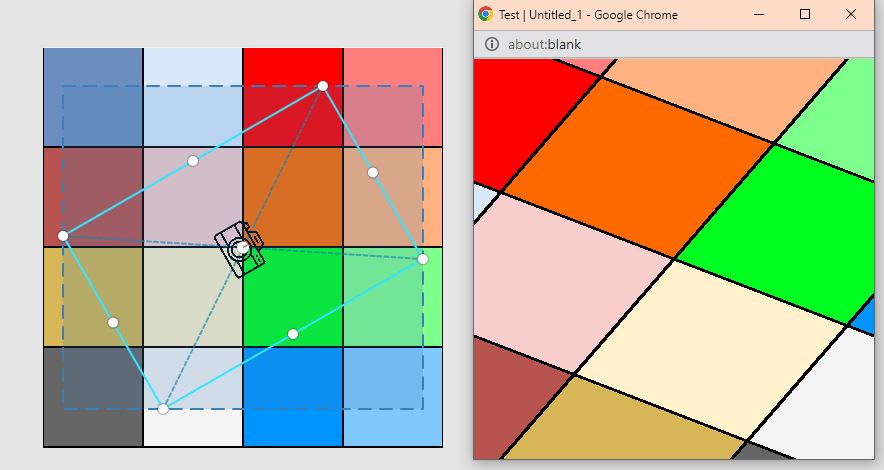
It looks weird, but trust me, it is projected accurately.
How to use it
FlevaR provides a VCam module that developers can use to manipulate any of the properties of the virtual camera:
const sVal = 15;
const rVal = 3;

if(Key.isDown(Key.A)) {
    VCam._width -= sVal;
} else if(Key.isDown(Key.D)) {
    VCam._width += sVal;
}
if(Key.isDown(Key.W)) {
    VCam._height -= sVal;
} else if(Key.isDown(Key.S)) {
    VCam._height += sVal;
}
if(Key.isDown(Key.Q)) {
    VCam._rotation -= rVal;
} else if(Key.isDown(Key.E)) {
    VCam._rotation += rVal;
}
if(Key.isReleased(Key.R)) {
    VCam._rotation = 0;
    VCam._width = 400;
    VCam._height = 400;
}
How I would improve it
Consistent API
Some naming conventions in the APIs are inconsistent, such as _anchorX, and _xScale. I originally used _anchorX as an additional property separate from Adobe Flash AS2's syntax, but when adding scale APIs to VCam, I used the _xScale as implemented in Adobe Flash AS2. For consistency, I should either choose the naming conventions as _anchorX and _scaleY, or _xAnchor and _xScale, rather than the confusing interchanged properties.
Multiple Virtual Cameras
I once had many difficulties creating a split screen two player game with Adobe Flash AS2; I first needed to create duplicate movieclips for every player, enemy, and world object, and nest each player's world within a cropped version of the world to give the illusion of a split screen. It would have been much easier if I could create the world once, and add 2 virtual cameras, making one follow player 1 on half the screen, and making another follow player 2 on the other screen half.
Additionally, for games with minimaps or "camera" systems, it would be very powerful if the developer can use a VCam within the engine to project a portion of the world on only a portion of the screen, rather than having to create duplicate flevaclips for maps or camera objects.
Due to knowledge limitations at the time, I could only accomplish one VCam after 5 months of efforts, so I left it at that. However, FlevaR has plans to support multiple VCams in the future. Instead of only setting what should be projected on the screen, the developer will be able to configure what would be projected, and where on the screen it will be projected! If the developer desires, they can have the default VCam rendering the player, and additional VCams projecting a room, and displayed on numerous sides of the screen. Here is how it looks in theory:
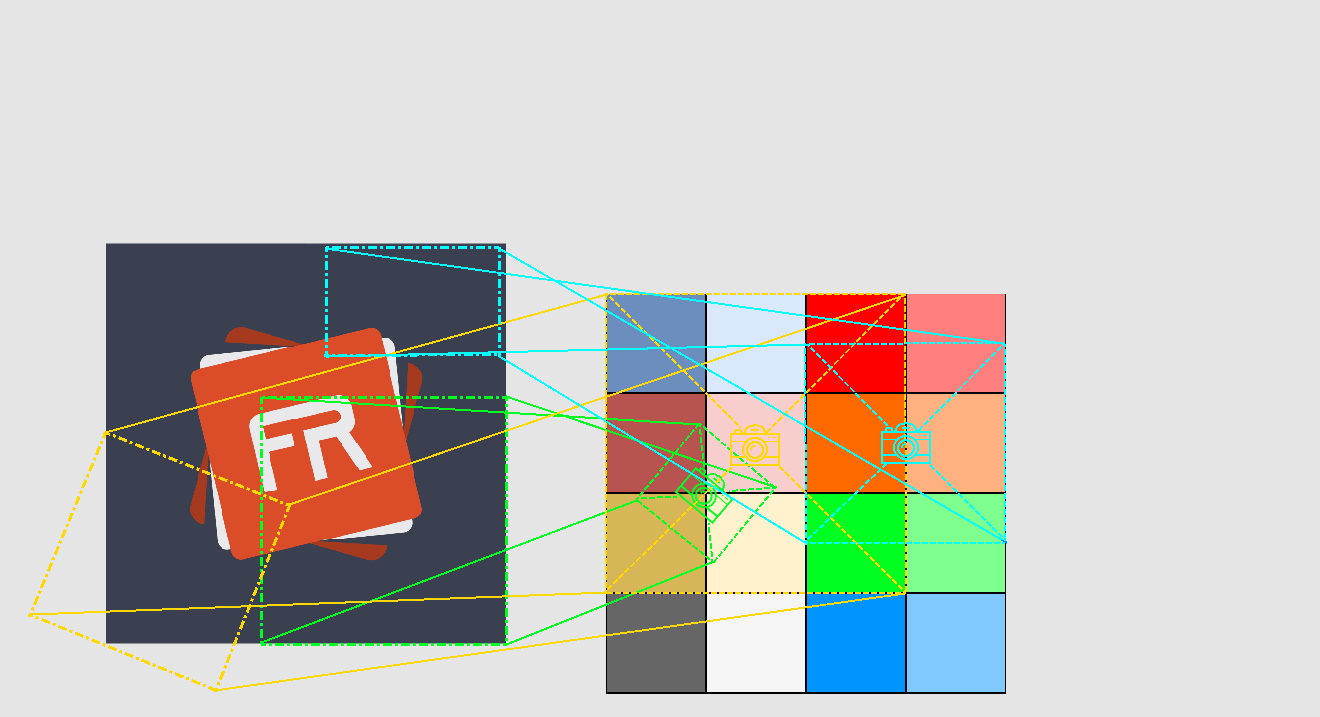
Looking complicated? Here's a breakdown of 3 virtual cameras. They can project any size, position and rotation of the scene, and can be displayed at any size, position, and rotation on the screen:
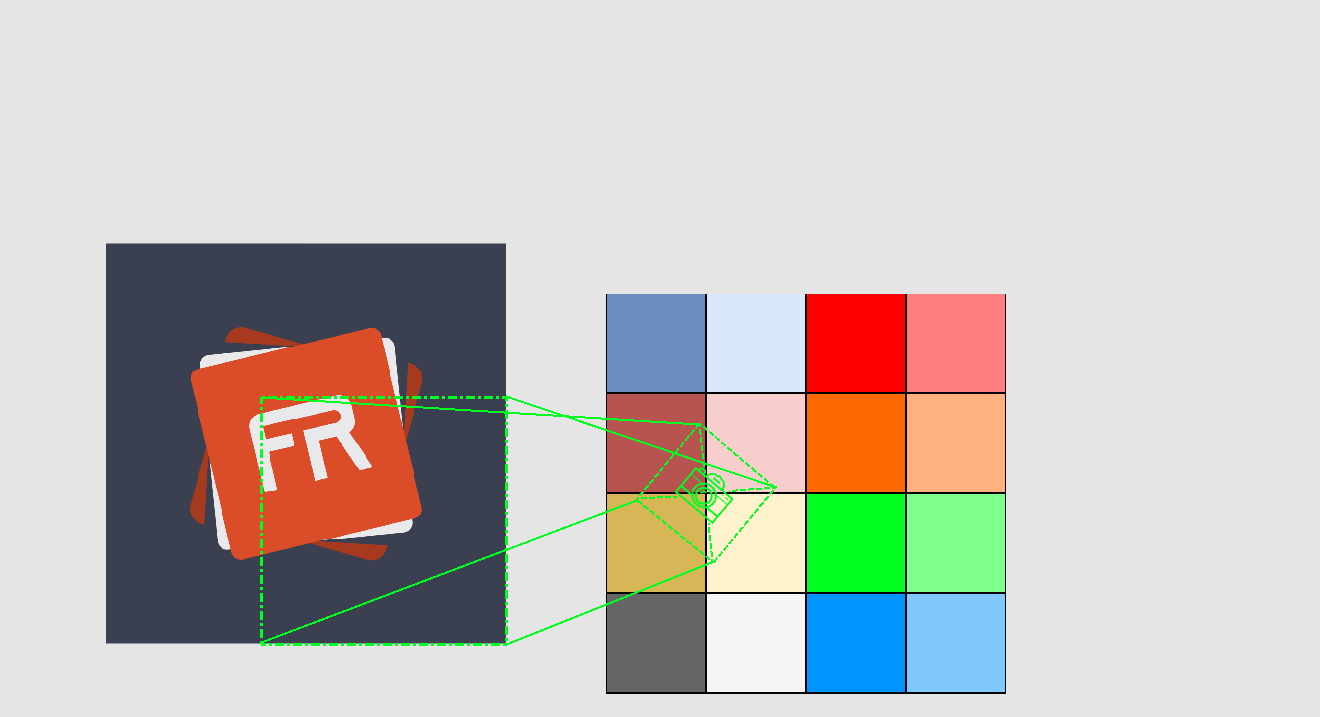
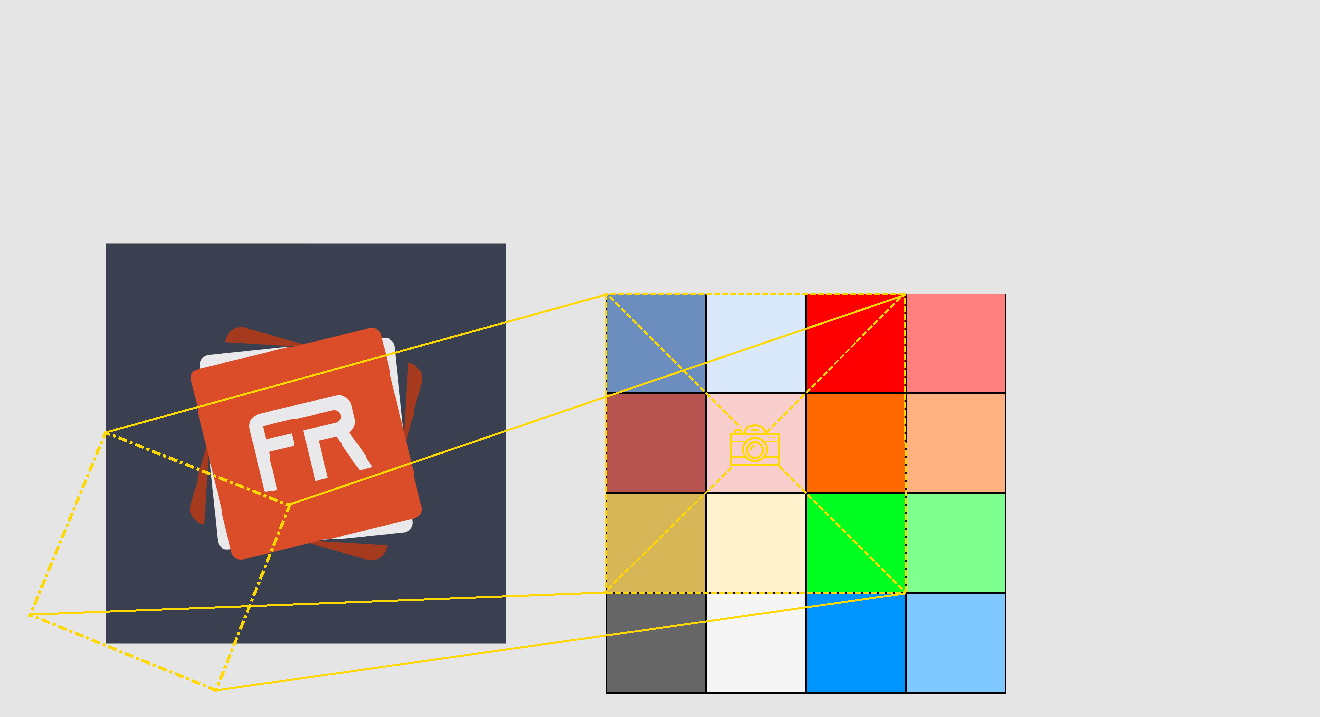
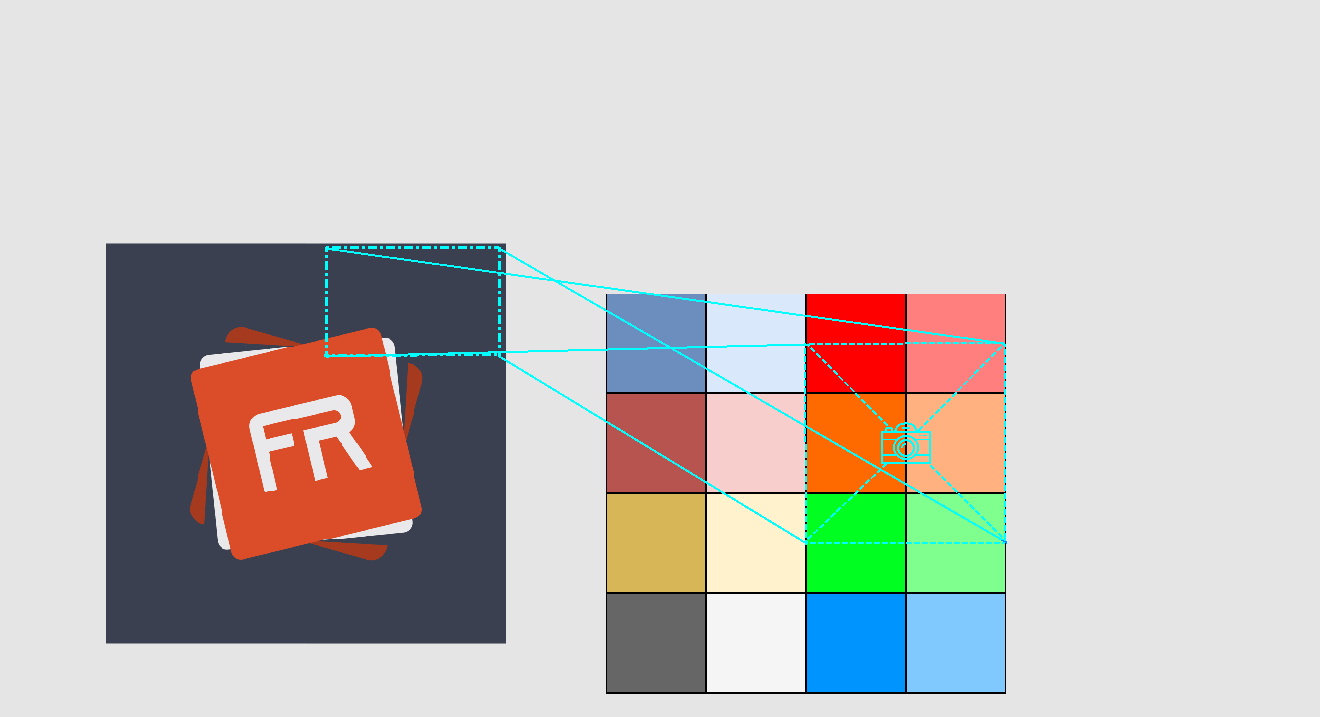
The ending result will have projections of each VCam at their respective locations on the screen:
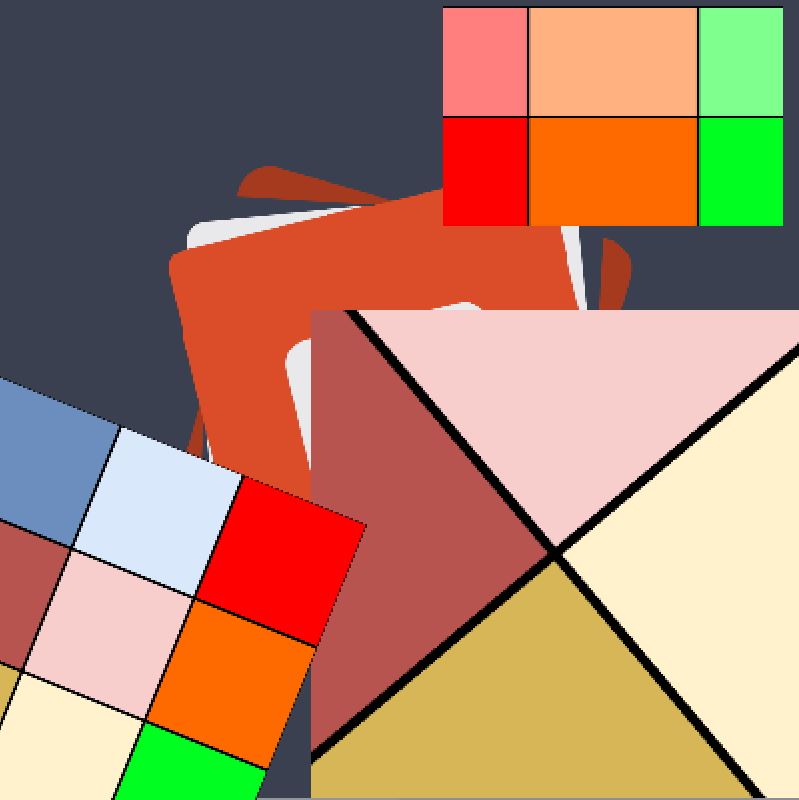
As you noticed, VCams can be layered too!
Current Virtual Camera Development
Because of recent progress/optimizations I made on context 2d's draw calls, the experimental render engine can already support multiple VCams with configurable projections and views. Best of all, it still renders over 1000 objects at 60fps:
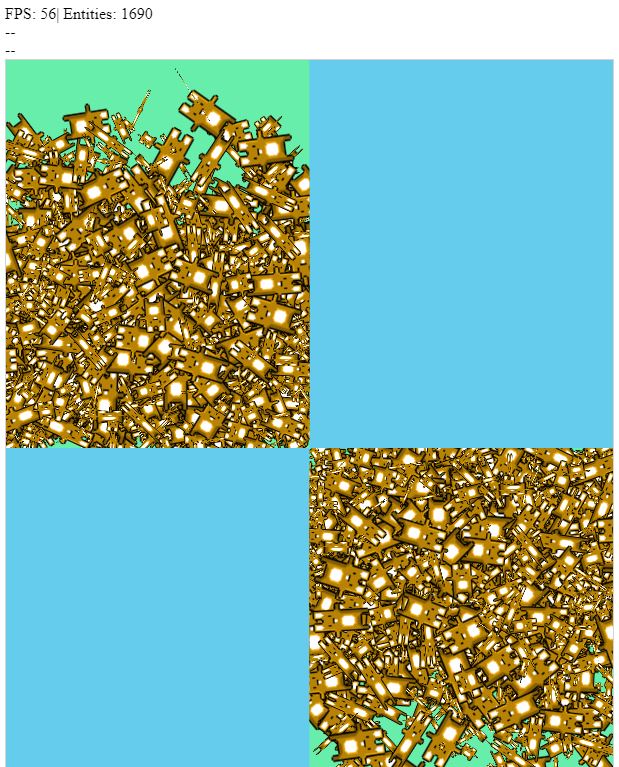
Event Handling
Numerous frameworks or game engines mention event handlers (to catch when a mouse is pressed, a key is typed, or otherwise). Even Adobe Flash APIs had events such as onRelease, onPress, and more. Aside from a very hacky onClick() event on flevaclips, FlevaR currently has no built-in APIs that capture events and dispatch them to flevaclips or scene objects for the developer to use or modify. At the time of developing, it was not a high priority item for the engine, and later on proved too difficult to integrate with the developed architecture of the engine.
One example of the difficulty is trying to add a core.onMousePress event. Browser events, for example, has a target property that stores the element that received the event, so instead of adding 100 onMousePress events to each element, the developer can set 1 onMousePress event and use the target property to determine which of the 100 elements was pressed.
However, Flevaclips can be any determined sizes or positions, and can change their transform very dynamically. Thus, if FlevaR had to determine which flevaclip the mouse hovered each frame, it would need to loop through all flevaclips on the stage. FlevaR had no existing way to optimize flevaclips in chunks or BSTs based on fixed sizes, because the developer can alter the transforms such that the chunk sizes would not be compatible. This is also a problem because depending on the size of a flevaclip, its _x and _y positions can be off the visible screen, but its _rotation and size would be such that it still crosses the view, hence it will need to be checked for mouse events as well.
Chunk-based optimizations such as that is left up to the individual developer, based on their particular game; they will know what constraints to use
To get around this currently, instead of looping all flevaclips for mouseovers, FlevaR only loops over flevaclips that the developer explicitly added a onClick() event to; this saves loop resources each frame.
I'll have to do more research to find an optimized way to loop these things regardless of their positions, sizes, offsets, and rotations; for hundreds of flevaclips, many times per second, at performant speed.
Currently, the goto APIs provided are simply Mouse and Key modules and their isUp, isDown, isPressed, and isReleased methods.
Root Proxy
One of the most powerful (but slow) APIs FlevaR provides is the _root property. It is defined as the engine's stage, used to reference stage properties and methods, or flevaclips within the main lifecycle of the application.
What influenced it
Adobe Flash. Adobe Flash. Adobe Flash.
Adobe Flash's AS2 API provided a _root object that gave the developer access to many properties in the application:
- If you gave a movieclip an instance name of
"character", you can access it with code through_root.character. - If you wanted to get the mouse positions, you can access them with
_root._xmouseand_root._ymouse. - If you wanted to use core methods or go to other frames, you can with root (
_root.gotoAndStop()). - If you redefined an existing accessible object (
_root._xmouse = "Hello world") it would be ignored. - If you tried to access a non-existent root property (
_root.noProp) or nested root property (_root.my.values.do.not.exist), Flash would simply returnundefinedinstead of throwing an error.
How it works
I wanted to also provide a _root property with the flexibility allowed in AS2. The best way (or rather, only way) to do that in JavaScript was using a Proxy object. These objects intercept and redefine fundamental operations for the object.
The FlevaR proxy is a very complicated one; when trying to access (get) a property, the following sequence is followed:
- If
toStringis accessed (_root.toString()), return the string"[root Stage]". - If reserved properties (
_root.type) is accessed, return their value. - If a string matching an existing flevaclip's instance name (
_root.character) is accessed, return the flevaclip and/or property of the flevaclip (_root.character._x). - If a property of the stage (
_width,_color, etc) is accessed (_root._color), return the value. - If a method of the stage (
attachPrefab(),removePrefab(), etc) is accessed (_root.attachTextfield()), call the method on the stage. - If a string matching no existing property was accessed (
_root.noProp), return"undefined". - If a non-existent object was accessed, return a nested root proxy that just returns
"undefined"instead of errors for missing objects and missing object properties. It treats each new key in a nested object as another proxy object, so_root.my.values.do.not.existwould return"undefined"instead ofError: cannot access "values" of undefined object: "my"as is usually expected in JavaScript.
Trivia: The nested root proxy on step 7 of the sequence is called a
floxyChainforFlevaR Proxy Chain. See the entire internal code for FlevaR's _root proxy here (Line 7573 of the engine)
A similar sequence is followed when modifying (set) a property:
- If reserved properties are modified (
_root.type = "flobtives"), silently ignore. - If a string matching an existing flevaclip's instance name (
_root.character = "Hello FlevaR!") is modified, silently ignore.
The code_root.character._x = 5will work because_root.charactergets the flevaclip, andflevaclip._x = 5modifies it as expected. - If a property of the stage (
_width,_color, etc) is modified (_root._color = "green"), set the value of the stage property. - If a method of the stage (
attachPrefab(),removePrefab(), etc) is modified (_root.attachTextfield = 21), silently ignore. - If a non-existent object is modified (
_root.my.values.do.not.exist = "yes I do exist now", silently ignore. - Silently ignore anything otherwise.
Root Order Priority
As noticed, the simplified order priority when accessing or modifying root properties is as follows:
- FlevaClips
- Stage Properties
- Stage Methods
How to use it
Let's start with an empty unmodified scene:

Change the stage's colour to a blue colour:
_root._color = "#3B4050";

Add a prefab with instance name of "myCoolPrefab" to the stage:
_root.attachPrefab("my_prefab", { _x: 45, _y: 60, instanceName: "myCoolPrefab", attachedName: "myAttachedClip" });

Modifying the attached prefab:
_root.myCoolPrefab._x = 100;

Removing the attached prefab:
_root.removePrefab("myAttachedClip");

As noticed, the prefab is located for removal through the
attachedNamestring.
Due to the order priority, giving flevaclips instance names that conflict with stage properties/methods causes the _root accessor to reference the flevaclips instead. This is consistent with Adobe Flash AS2's APIs as well. Thus, assuming a flevaclip on stage has instanceName: "_color":
/* Within scene's onload */

// add flevaclip to scene
scene.addPrefab("my_prefab", { _x: 150, instanceName: "_color" });
Attempting to change the scene's _color will silently fail:
// attempt changing stage's color to blue
_root._color = "green"; // <-- silently fails

// trace _color property in _root
flevar.trace(_root._color);

// > [type Prefab]
How I would improve it
Convert to Root Object
Rather than a slow proxy, an object should be used to store the dynamic values.
Currently, any stage properties are accessed from an internal Stage module, which also uses getters and setters to prevent bugs (in case the developer types stage._width = "hello world", crashing the game, since many of the internal components in the engine depends on the width of the stage being a number value). A proxy on top of getters and setters means an even slower engine. I would optimize this by placing the properties and methods directly on a _root object, and accessing them there internally as well.
Currently, root loops through all active flevaclips to see if an instance name matches the desired key being accessed on the root. To optimize this, flevar can cache flevaclips by internally adding all flevaclips with instance names to a dictionary/bucket of the root object. Thus, checking for an existing flevaclip by instance name would check the cache immediately and remove the loop that increases with the number of active flevaclips.
Although these optimizations can remove the proxy, getters and setters, and increase the engine performance at scale, the developer would no longer be as protected as before: bad code such as
_root._color = 5;and_root.my.values.do.not.existwould cause unexpected results or crash the engine with errors. Such is the sacrifice to be made for speed and optimizations.
Separate into Distinct Modules
Unless accustomed to by developers, having one object store properties for separate modules, and depending on the developer to remember priorities and possible overwrites, while flexible, can become tedious. Separating properties into more explicit modules can help:
- Put all stage properties and modules into a provided
StageAPI: (Stage._wdith,Stage._colour,Stage.attachPrefab(), etc) - Put all mouse properties in its
MouseModule: (Mouse._x,Mouse._y) - Use explicit functions for accessing flevaclips: (
getFlevaclip("myCoolPrefab"))
The
_rootobject may stick around for convenience, but maybe the module separation can improve explicitness and developer experience.
Performance Disclaimer
Numerous times I may mention a feature being "slow at scale" or "affecting performance" in the engine. Do note that these issues currently only arise when there are hundreds of flevaclips active at once:
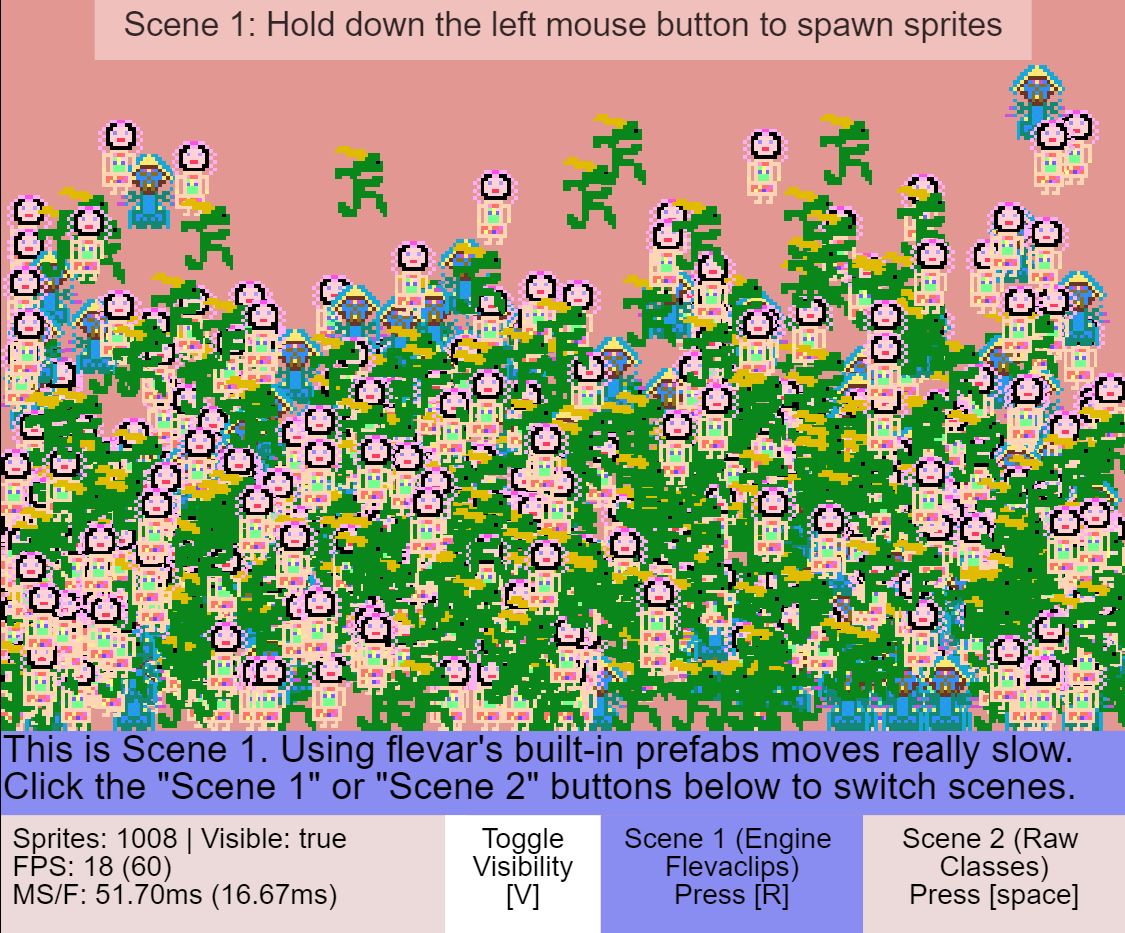
FlevaR can handle an average of 400 active flevaclips at 60ps, which is much more active flevaclips than an average scene would need:
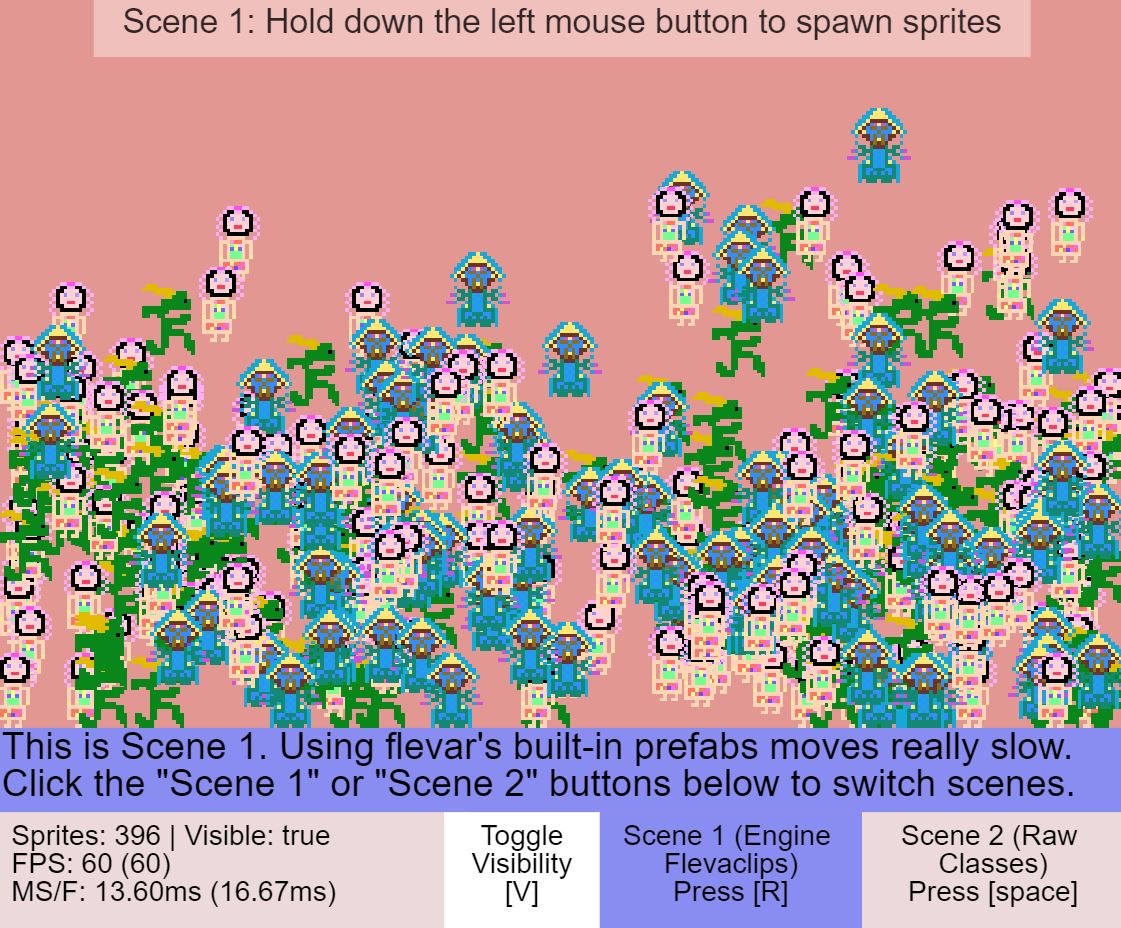
These drawbacks are due to multiple reasons, such as:
- the canvas2d render limitations
- the powerful but slow root proxy object
- general bad design (spaghetti code) of an earlier/naive Danidre developing the engine
Those caveats can be mitigated though, but that currently depends on the individual skills of the developer. The example below uses paintings and only considers the position of the object, not the width nor rotation. Thus, no transforms are required, allowing up to 4000 objects rendering per frame, with 60fps:
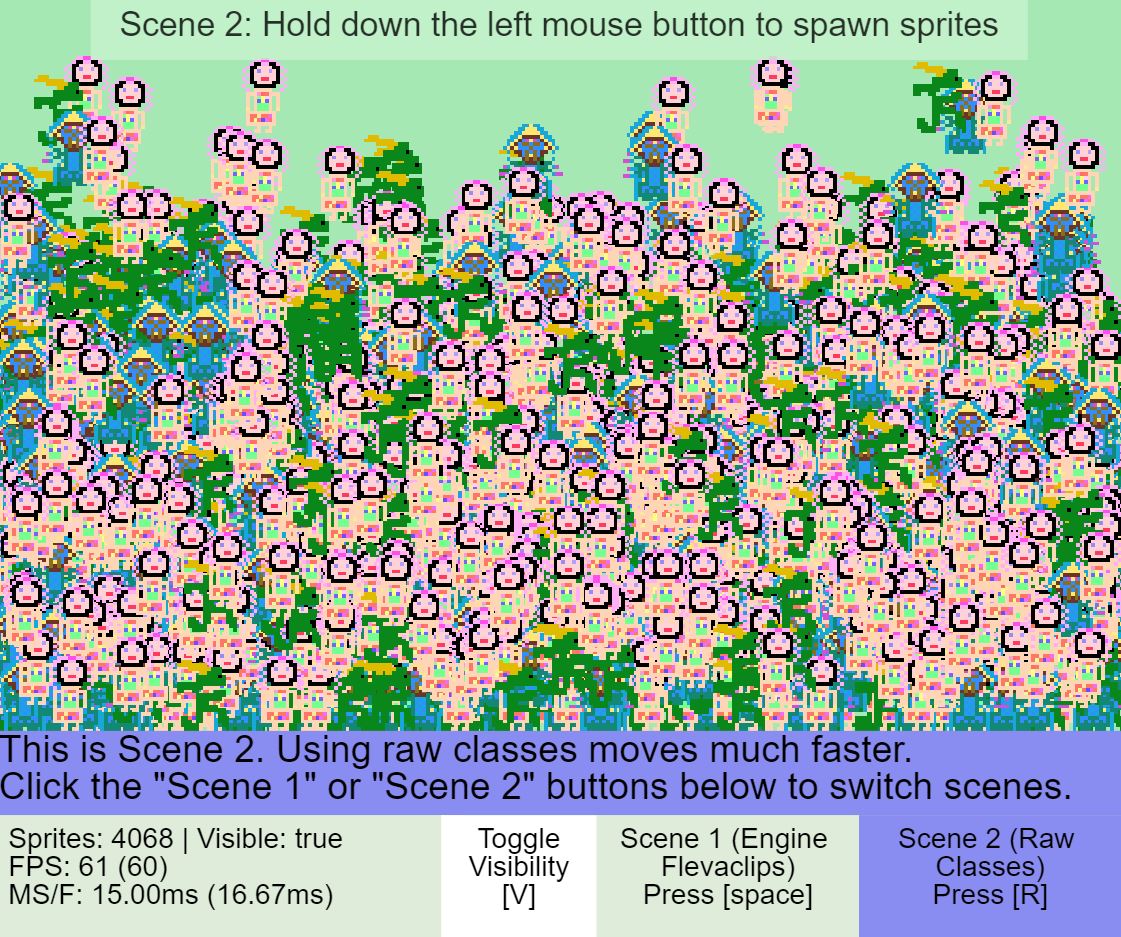
If they want to create a Shoot 'em up game, they can use one flevaclip with a painting for all bullets, rather than thousands of flevaclips for each bullet.
FlevaR's Future
The journey away from Adobe Flash took me on a learning journey and I had the most fun developing the game engine.
Funny enough, only after I created my engine, I discovered many existing JavaScript game engines and frameworks, such as CraftyJS, CreateJS, ImpactJS, Platypus, MelonJS, Wick Editor and so much more! Before that, I could have only found Phaser and PixiJS, so I thought those were the only existing JavaScript game engines or frameworks.
The variety in JavaScript game engines would get one thinking, why use FlevaR? Why not use an already existing game engine? I ask myself that, too! However, most of the frameworks listed are archived/outdated/discontinued. Additionally, FlevaR's goal is not to compete with established game engines such as Phaser. Rather, it aims to be a declarative JavaScript game engine, with APIs similar to Flash. It targets beginners and promotes a simple easy environment for developing applications. While being friendly, FlevaR's APIs also allow for complex applications if the developer needs it, and with JavaScript as the main language, it is easy for existing web developers to pick up and use it! All the abstractions from the browser and internal modules I stitched together is to make that possible. FlevaR provides; Developer decides.
Future Plans
Engine Re-Write
A FlevaR re-write is definitely planned, where I explore all the proposed optimizations for different modules. I'm currently in university, so the re-write may be a year-long process.
FlevaR Editor
I've since been working on a visual editor for FlevaR games, that can transpile applications to the browser or as a desktop app. Many of the visual examples in this article was made easier through the drag-and-drop editor.
Note: The editor is in heavy development!
Port Flash Games
The original goal was for me to learn to make games in a new language/engine, and port my old Flash games. Currently, a Flash Player emulator called ruffle exists, allowing my old Flash games to run in web browsers once more. However, it is still a future goal of mine to remake my Flash games in FlevaR.
Develop FlevaR Games
Although I work on the engine, I still want to make games, so I plan on using FlevaR for many more games. That way I can continue to test the user experience of the engine or fix bugs that may be discovered.
Until I get a team dedicated to finding bugs or assisting with engine development, I'll have to be both developer and tester!
FlevaR for Android/iOS
I created a Patreon for the development of FlevaR. With the remake of FlevaR, I also want to develop APIs to support touchscreen, so applications can work on mobile phones. I also want to provide services that can package FlevaR applications for Android and iOS devices.
FlevaR Website Portal and Additional APIs
One goal is to provide a portal for FlevaR web applications, similar to portals that exist for games made with Godot, GameMaker, or GDevelop. Users will be able to view and rate other FlevaR games, or fork the source code of games if permitted by the developer. Additionally, FlevaR APIs such as highscores and medals will be implemented to take advantage of the user system and bring more rewards for both FlevaR developers and players.
Conclusion
FlevaR has come a long way, and still has a long way to go; I am passionate about developing this engine and learning more every step of the way.
This article could not be done without the Epic Hashnode Writeathon, which encouraged me to write my dream article; this is something I've put off for almost 2 years!
This article was quite a read, so thank you for making it to the end. Hopefully it shares coherent insight on how you can use browser APIs for your own purposes. Maybe you do not need an entire engine; maybe you only need an asset manager, or a rendering system.
Regardless, I hope this article can serve as a gem for future website explorers or gamedev enthusiasts, just like many articles before this one helped FlevaR get to where it is!